
Genshin Impact possesses a multitude of characters that can deliver lethal blows. However, doing so while acting cool? That area is best reserved for Barbara and her Catalyst-based kit.
In terms of rarity, she’s a 4-star DPS carry that can adapt to your playstyle to provide chunky damage – both in and out of the field. However, finding good builds for her can be tough.
So, in this guide, we will show everything you need to know in order to play Barbara to her strengths while finding success with her.
Who Is Barbara In Genshin Impact?
Barbara is a playable 4-star Hydro character in Genshin Impact. She is a Catalyst user who focuses on healing her allies and deals Hydro damage to all enemies.
miHoYo released her on September 28, 2020. Barbara’s kit is suited to Support, and she is considered one of the best healers in the game.
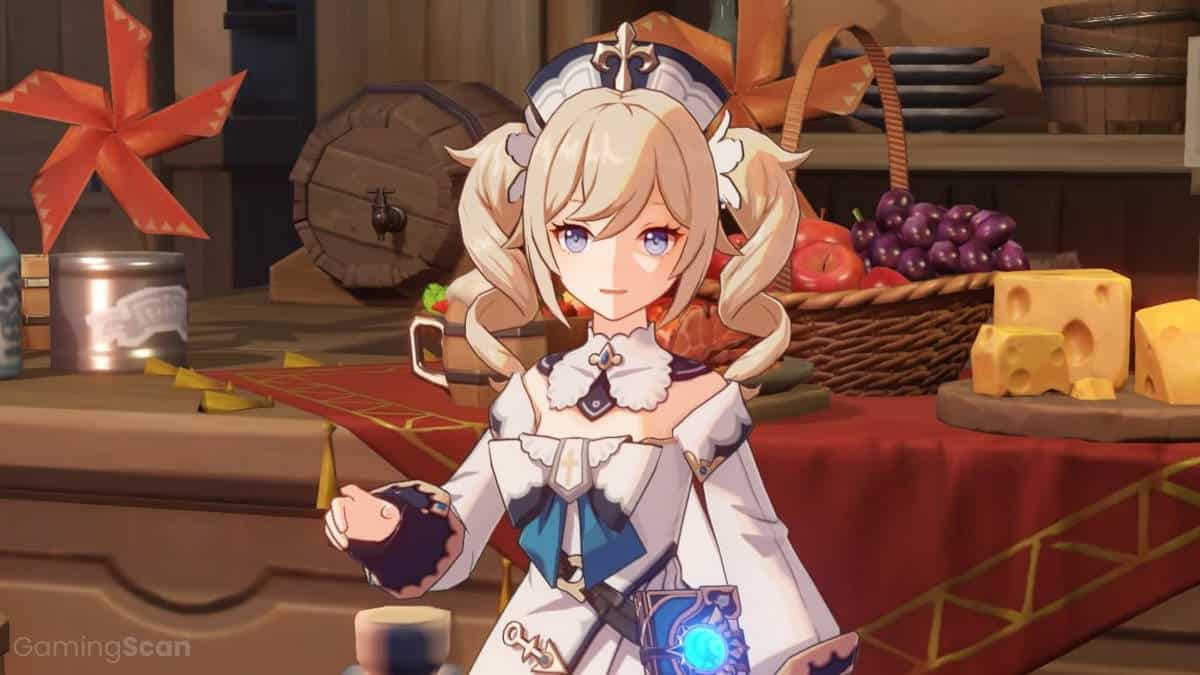
Barbara | via GamingScan
Barbara is the deaconess of the Church of Favonius while also being a prominent idol. This transformation happened after she learned about idols from Alice.
All in all, Barbara is the younger sister of Grand Master Jean and is generally rocked as a mix of DPS and support on the battlefield.
Best Barbara Builds In Genshin Impact
As mentioned previously, Barbara usually possesses an insane healing output. However, pairing that with her elemental skill gives her the stability she needs to carry teamfights.
With that said, she is usually pretty rigid when it comes to build choices since there’s either this or that – no in-between. Therefore, we recommend you stick to the following items:
Best Weapons On Barbara – Dendro Build
There are two options for weapons on Barbara. Sacrificial Fragments and Wandering Evenstar. This is primarily because the mentioned ones buff up her support prowess – making her as sturdy as ever.
Fortunately though, these weapons are pretty good in terms of standalone firepower. Therefore, you won’t have to worry about taking forever to kill enemies.
Sacrificial Fragments
This is a 4-star Catalyst possessing the power to amplify your attacks. Whenever you deal damage to an opponent with the help of an Elemental Skill, you have a 40% – 80% chance of getting a CD refund on the used skill.
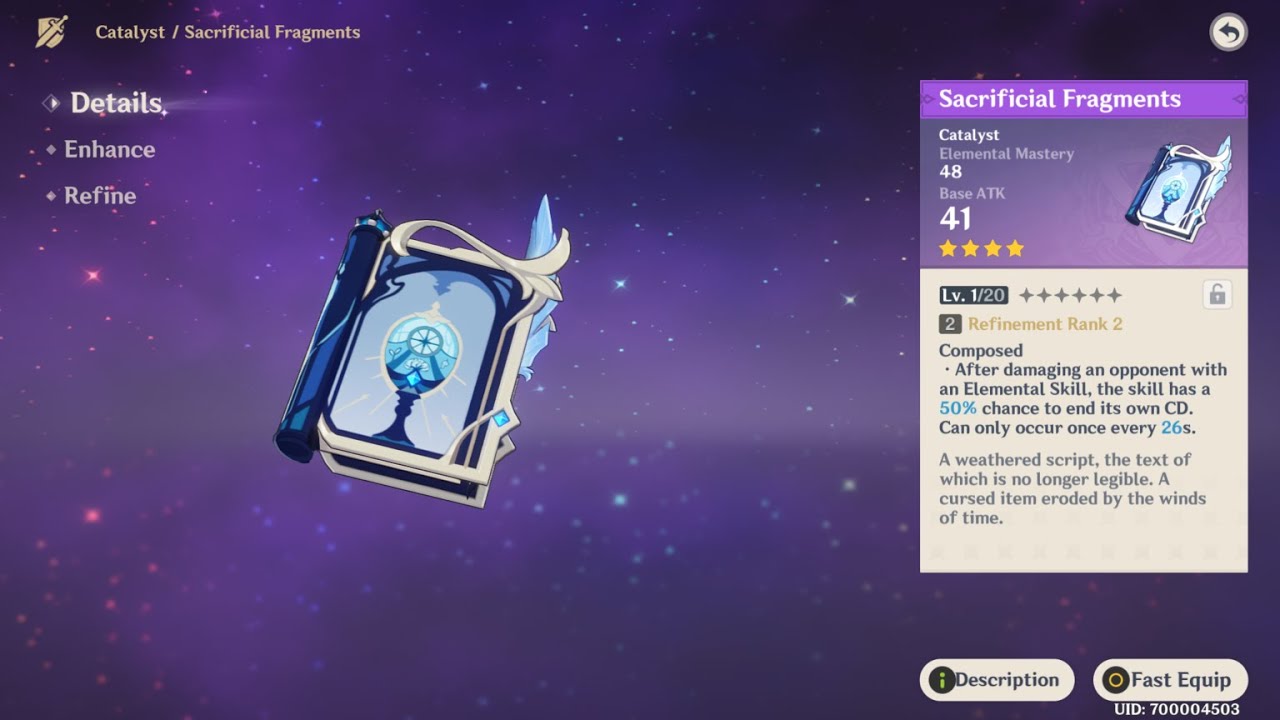
Sacrificial Fragments | via YAMATO IMPACT
This effect only lasts for about 30 – 16 seconds but pairs pretty nicely with Barbara’s support attack style. This skill is known as Composed, and it can activate for each hit – given your character is on the field.
Consequently, even the skills possessing multiple charges have their cooldown refreshed. However, this also means that you won’t be able to perform a specific step in a skill if you activate this ability too early.
With that said, here’s how the general stats of Sacrificial Fragments pan out:
| Base ATK (LVL 1 – 90) | 2nd Stat Type | 2nd Stat (LVL 1-90) |
| 41 – 454 | Energy Mastery |
48 – 221 |
Sacrificial Fragments has been made available from the following wishes:
- Epitome Invocation ( 2020-10-20 ): This wish was previously available from October 20, 2020 – November 10, 2020.
- Epitome Invocation ( 2020-12-23 ): This wish was previously available from December 23, 2020 – January 12, 2021.
- Epitome Invocation ( 2021-05-18 ): This wish was previously available from May 18, 2021 – June 8, 2021.
- Epitome Invocation ( 2021-08-10 ): This wish was previously available from August 10, 2021 – August 31, 2021.
- Epitome Invocation ( 2021-12-14 ): This wish was previously available from December 14, 2021 – January 4, 2022.
- Epitome Invocation ( 2022-03-08 ): This wish was previously available from March 8, 2022 – March 29, 2022.
- Epitome Invocation ( 2022-06-21 ): This wish was previously available from June 21, 2022 – July 12, 2022.
- Epitome Invocation ( 2022-09-28 ): This wish was previously available from September 28, 2022 – October 14, 2022.
Once you’ve obtained it, be sure to prepare the following materials for its ascension to rank 0-6:
|
Item |
Quantity |
| Mora | 150,000 |
| Fetters of the Dandelion Gladiator | 3 |
| Chains of the Dandelion Gladiator | 9 |
| Shackles of the Dandelion Gladiator | 9 |
| Dream of the Dandelion Gladiator | 4 |
| Chaos Device | 15 |
| Chaos Circuit | 18 |
| Chaos Core | 27 |
| Treasure Hoarder Insignia | 10 |
| Silver Raven Insignia | 15 |
| Golden Reven Insignia | 18 |
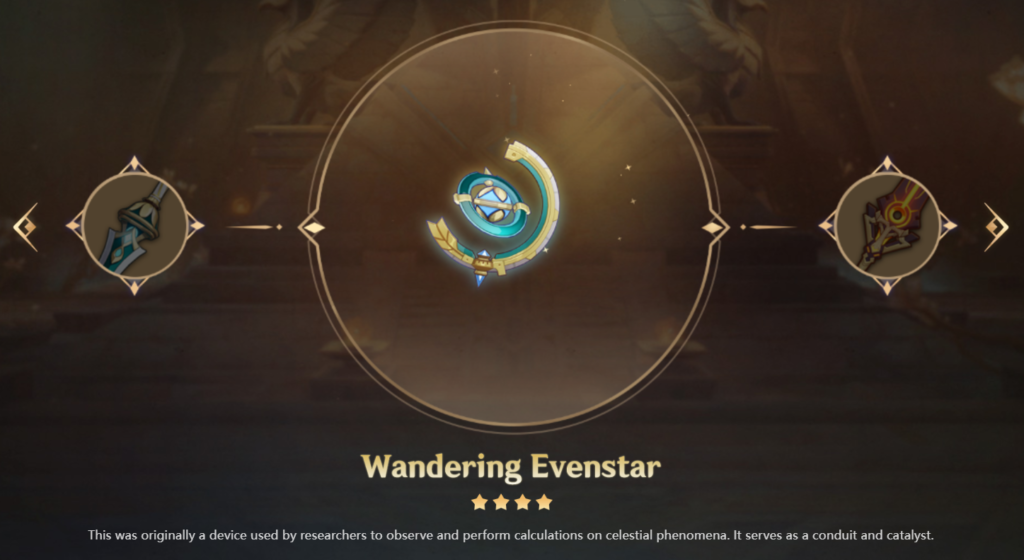
Wandering Evenstar
This is a Catalyst-type 4-star weapon that is capable of boosting the attack power of a carry – based on their Elemental Mastery.
This effect is called Wildling Nightstar, and it triggers once every 10 seconds. The character that equips the Wandering Evenstar (Barbara in this case) will gain anywhere around 24% – 48% of their Elemental Mastery as Attack Damage.

Wandering Evenstar | via Dot Esports
This allows hybrid carriers like Barbara to spec for damage while gaining the best of both worlds. After activation, the Wildling Nightstar lasts for about 12 seconds.
As a cherry on top, your Party Members also experience 30% benefits of this buff. The Wildling Nightstar effect is stackable on multiple instances of the same weapon and doesn’t need the character to be on-field for the buff to work.
With that said, here’s how the stats of Wildling Nightstar pan out:
| Base ATK (LVL 1 – 90) | 2nd Stat Type | 2nd Stat (LVL 1-90) |
| 42 – 510 | Elemental Mastery |
36 – 165 |
This weapon has only been showcased in one major wish event so far due to its recent release:
- Epitome Invocation ( 2022-10-14 ): This wish was previously available from October 14, 2022 – November 1, 2022.
Aside from the mentioned attributes, you’d need the following materials to unlock the weapon’s full potential through Ascension:
|
Item |
Quantity |
| Mora |
150,000 |
|
Oasis Garden’s Reminiscence |
3 |
| Oasis Garden’s Kindness |
9 |
|
Oasis Garden’s Mourning |
9 |
| Oasis Garden’s Truth |
4 |
|
Inactivated Fungal Nucleus |
15 |
| Dormant Fungal Nucleus |
18 |
|
Robust Fungal Nucleus |
27 |
| Fungal Spores |
10 |
|
Luminescent Pollen |
15 |
| Crystalline Cyst Dust |
18 |
Best Weapons On Barbara – Healing Build
Barbara’s kit allows you to choose between a damage dealer or a healer. While you can choose to go in between without any consequences, the Healing Build generally takes precedence in terms of popularity.
Having said that, weaponizing for a healer can be a source of confusion. Therefore, let’s look at some of the most suited weapons on Barbara for a Hybrid healer or a full Healer build:
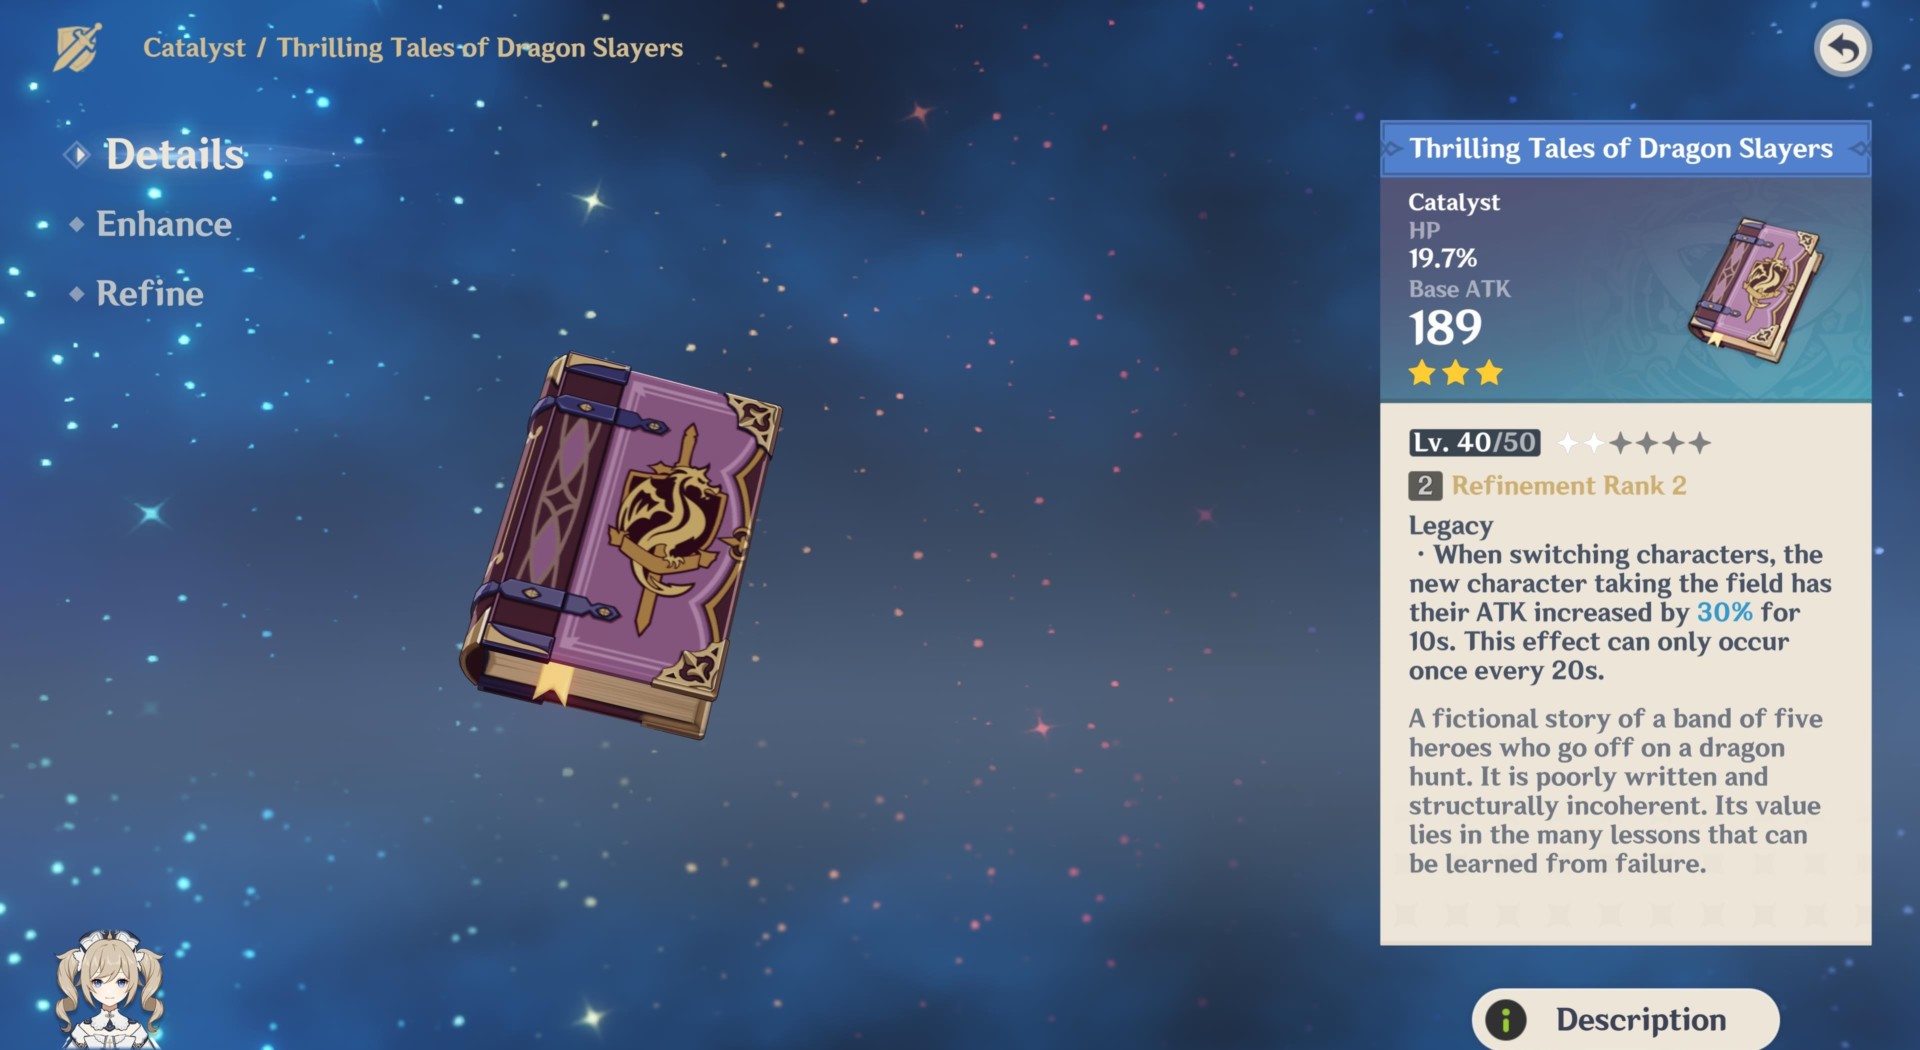
Thrilling Tales of Dragon Slayers
This three-star Catalyst weapon can boost your attack damage by 24% – 48% for the next 10 seconds. The ability is called Heritage, and it triggers whenever you switch characters within the field.
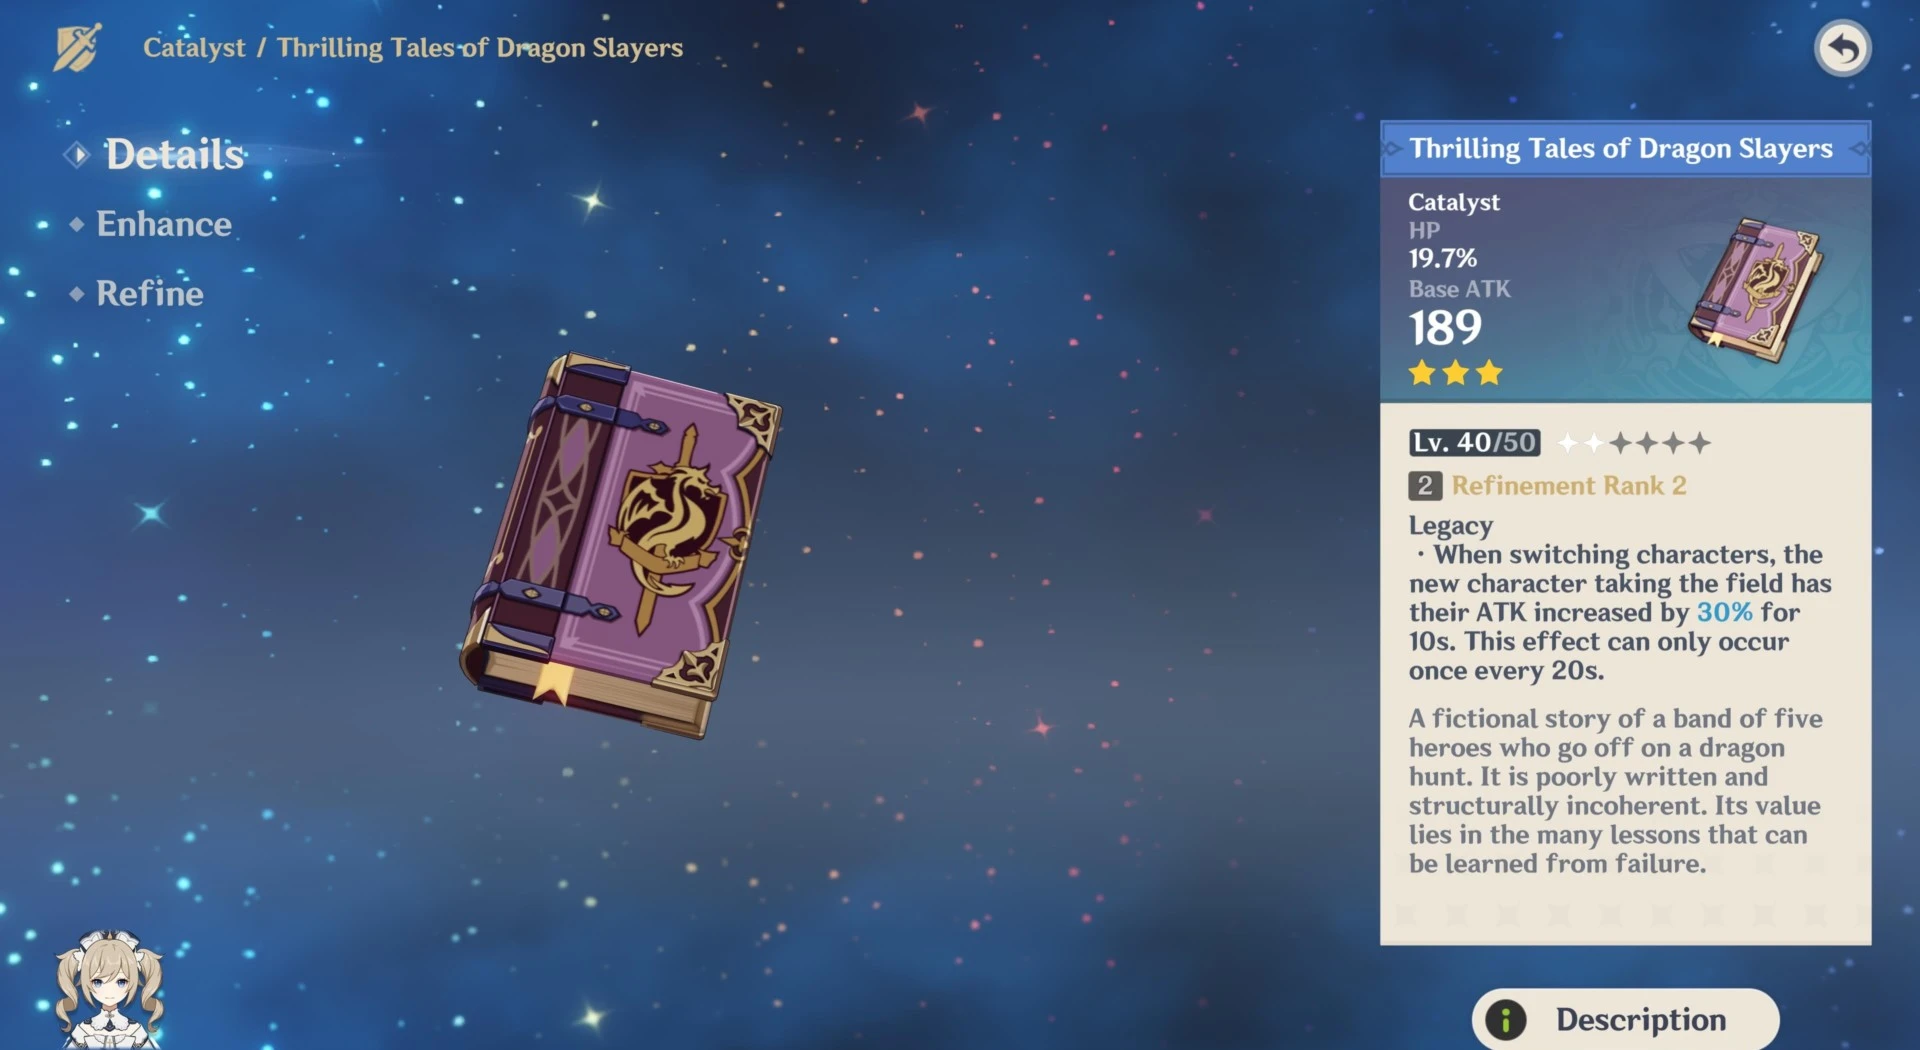
Thrilling Tales of Dragon Slayers | PC Invasion
Unfortunately though, it has a cooldown time of 20 seconds. Therefore, you cannot reach top damage in an instant.
The Thrilling Tales of Dragon Slayers is extremely good for achieving top damage with Barbara’s Elemental Burst. However, it’s more oriented to be used as an HP battery due to its second stat.
With that said, here’s the stat configuration for the Thrilling Tales of Dragon Slayers:
| Base ATK (LVL 1 – 90) | 2nd Stat Type | 2nd Stat (LVL 1-90) |
| 39 – 401 | HP |
7.7% – 35.2% |
Due to its 3-star rarity, you’ll be able to find this weapon in almost every event wish. However, its ascension materials can be a bit costly compared to the weapons in this grade. Therefore, make sure to prepare the following:
|
Item |
Quantity |
| Mora |
105,000 |
|
Boreal Wolf’s Milk Tooth |
2 |
| Boreal Wolf’s Cracked Tooth |
6 |
|
Boreal Wolf’s Broken Fang |
6 |
| Boreal Wolf’s Nostalgia |
3 |
|
Dead Ley Line Branch |
10 |
| Dead Ley Line Leaves |
12 |
|
Ley Line Sprout |
18 |
| Divining Scroll |
6 |
|
Sealed Scroll |
10 |
| Forbidden Curse Scroll |
12 |
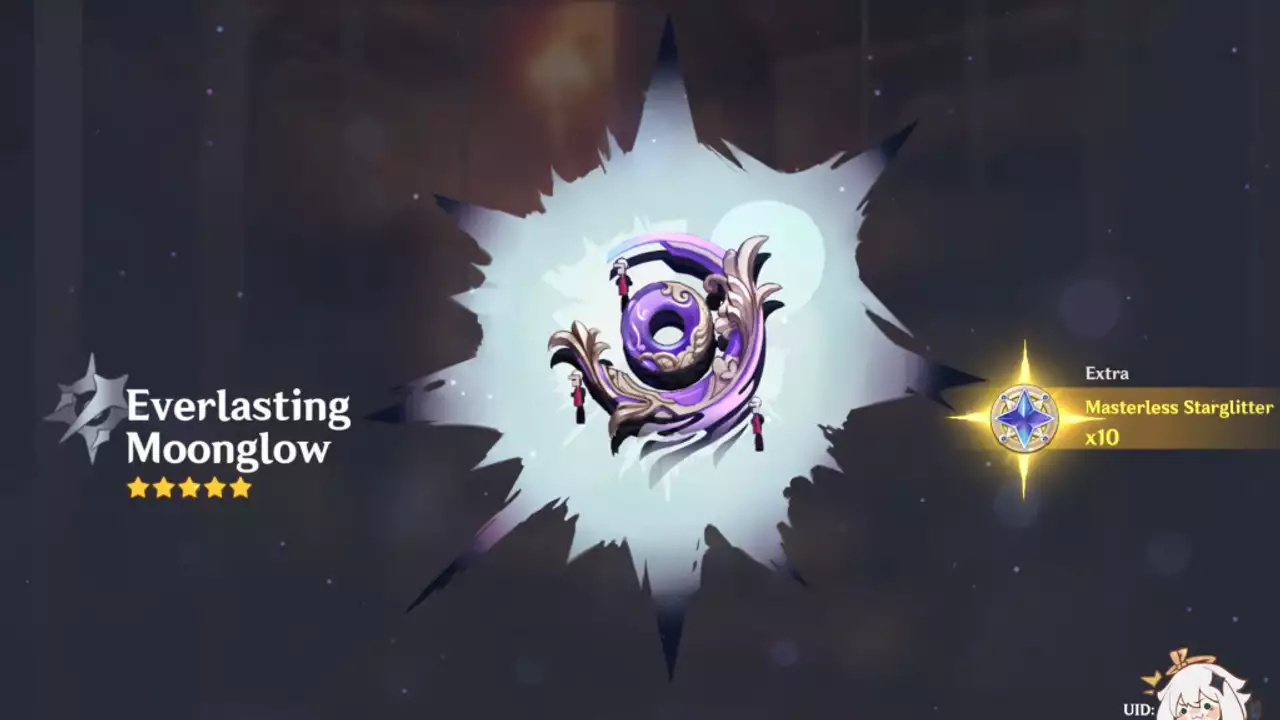
Everlasting Moonglow
This is a 5-star Inazuman Catalyst that promises the best of the best when it comes to equipping Barbara. Its ability is called Byakuya Kougetsu, which essentially increases your healing bonus.

Everlasting Moonglow | via GINX Esports TV
The leap can be anywhere between 10% to 20% – depending on the refinement level. Aside from this, your Attack DMG also experiences a boost equivalent to 1% to 3% of your maximum HP.
Once you’ve used your Elemental Burst, after 12 seconds, your normal attacks will begin to restore 0.6 Energy per hit. However, this restoration method has a short cooldown of 0.1s per hit.
Here is the stat distribution for Everlasting Moonglow:
| Base ATK (LVL 1 – 90) | 2nd Stat Type | 2nd Stat (LVL 1-90) |
| 46 – 608 | HP |
10.8% – 49.6% |
The Byakuya Kougetsu is a tailor-made tanky item that essentially enables you to heal more, damage more, and tank more!
With that said, the Everlasting Moonglow was promoted in the following Event Wishes:
- Epitome Invocation ( 2021-09-21 ): This wish was previously available from September 21, 2021 – October 12, 2021.
- Epitome Invocation ( 2022-03-08 ): This wish was previously available from March 8, 2022 – March 29, 2022.
- Epitome Invocation ( 2022-09-09 ): This wish was previously available from September 9, 2022 – September 27, 2022.
Since it is a 5-star weapon, the ascension materials can prove to be a challenge to gather. In total, you’d need the following items to completely ascend your Everlasting Moonglow:
|
Item |
Quantity |
| Mora |
225,000 |
|
Coral Branch of a Distant Sea |
5 |
| Jeweled Branch of a Distant Sea |
14 |
|
Jade Branch of a Distant Sea |
14 |
| Golden Branch of a Distant Sea |
6 |
|
Dismal Prism |
23 |
| Crystal Prism |
27 |
|
Polarizing Prism |
41 |
| Spectral Husk |
15 |
|
Spectral Heart |
23 |
| Spectral Nucleus |
27 |
Best Artifacts On Barbara
Since Barbara can adopt both playstyles, you can either choose a healing-based Artifact for the healing build or a damage-oriented one for a frontline playstyle.
Having said that, here’s the best of both worlds:
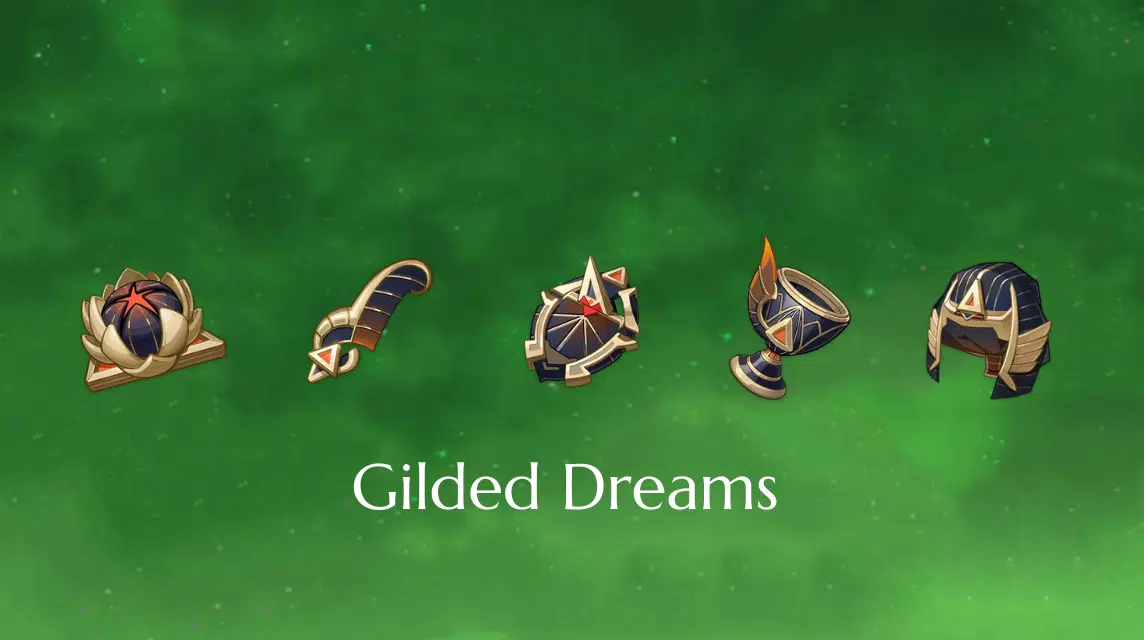
Gilded Dreams – Dendro Core
This artifact set boosts you and your party member’s Elemental Mastery while providing a nice set of stats to the wielder.

Gilded Dreams | via VCgamers
The Gilded Dreams set consists of the following:
- Flower of Life: Dreaming Steelbloom
- Plume of Death: Feather of Judgement
- Sands of Eon: The Sunken Years
- Goblet of Eonothem: Honeyed Final Feast
- Circlet of Logos: Shadow of the Sand King
The set bonuses for these artifacts activate at the following marks:
2 – Piece Bonus
Equipping any two of the above-mentioned items will increase your Elemental Mastery by 80 points.
4 – Piece Bonus
Once you’ve triggered your Elemental Reaction, the character in possession of this artifact set will obtain various buffs (depending on your party members) within the next 8 seconds.
For each Elemental Character with the same element type as you, gain a 14% increase in your ATK damage. Consequently, for each character in your party with a different element type, you’d gain a +50 increase in Elemental Mastery.
This effect is re-triggerable every three seconds and can be triggered even when the character is not on the field.
How To Obtain
Both 4* and 5* variants of this item can be obtained by challenging the Spire of Solitary Enlightenment.
This Domain of Blessing is located in the Avidya Forest within Sumeru. The higher the level you challenge and clear, the better the reward will be.
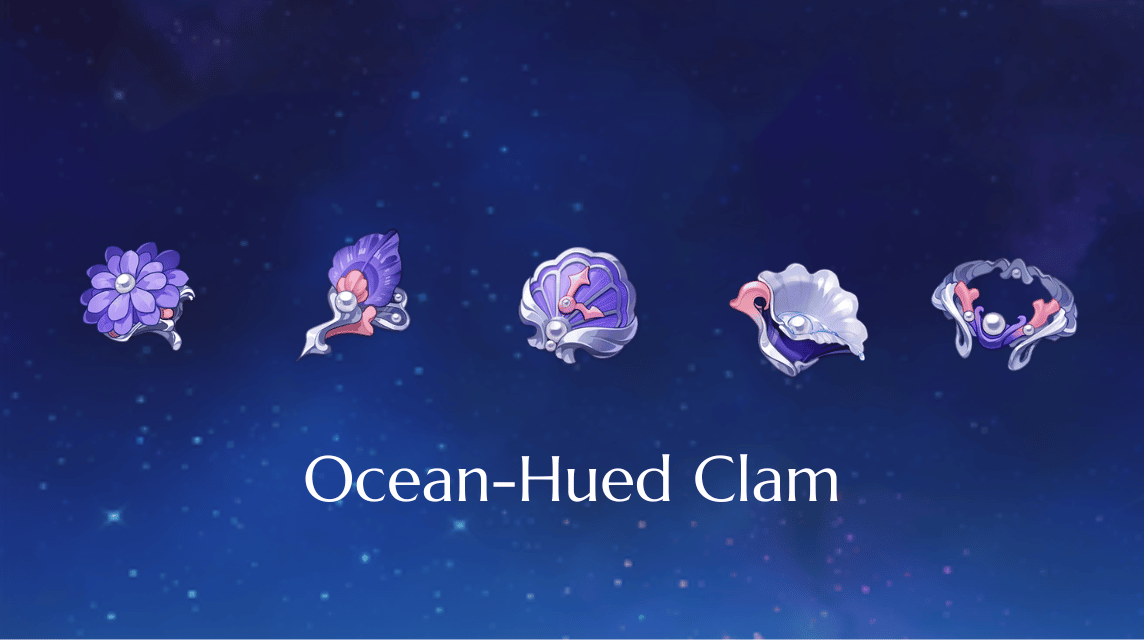
Ocean-Hued Clam – Hybrid Core
This artifact set increases your overall healing and regeneration. It accumulates HP to help you in various ways.
Ocean-Hued Clam | VCGamers
The Ocean-Hued Clam set consists of the following:
- Flower of Life: Sea-Dyed Blossom
- Plume of Death: Deep Palace’s Plume
- Sands of Eon: Cowry of Parting
- Goblet of Eonothem: Pearl Cage
- Circlet of Logos: Crown of Watatsumi
The set bonuses of these artifacts activate at the following marks:
2 – Piece Bonus
This bonus increases your total Healing Bonus by 15%. Considering you’re already opting for a Hybrid Build, this can boost your overall healing department.
4 – Piece Bonus
Whenever you heal a character in a party, a Sea Dyed Foam will appear and accumulate all the HP recovered by that character. This includes overflow healing as well.
Once the healing is over, the Sea Dyed Foam will explode while Dealing damage based on 90% of the accumulated healing. This foam has a cooldown time of 3.5 seconds and can accumulate around 30,000 HP.
The character itself doesn’t need to be on the field to trigger this effect, thereby making it one of the most overpowered bonuses, as long as you have a hybrid like Barbara in play.
How To Obtain
The Ocean-Hued Clam set can be obtained from the Slumbering Court – a Domain of Blessing located on Seirai Island.
The higher the levels you challenge, the better chances you have of obtaining the 4* and 5* rarities of the Ocean-Hued Clam.
Maiden Beloved – Healer Core
This artifact set solely focuses on the healing aspect and can enable your party to survive even against the hardest current in-game content.

Maiden Beloved Set | via Gaming Esports
The Maiden Beloved artifact set comprises the following:
- Flower of Life: Maiden’s Distant Love
- Plume of Death: Maiden’s Heart-Stricken Infatuation
- Sands of Eon: Maiden’s Passing Youth
- Goblet of Eonothem: Maiden’s Fleeting Leisure
- Circlet of Logos: Maiden’s Fading Beauty
The set bonuses of these artifacts activate at the following marks:
2 – Piece Mark
This Bonus increases your Healing effectiveness by 15% – allowing you to keep your allies’ HP to the max at all times – unless otherwise.
4 – Piece Mark
Whenever you use an Elemental Skill or Elemental Burst, you and your party member’s received healing is increased by 20% for the next 10 seconds.
How To Obtain
The 4* version of this set is available from both Adventurer Handbook and Valley of Remembrance, whereas the 5* variant is only available from the latter.
The Valley of Remembrance is a Domain of Blessing located between Dawn Winery and Dragonspine in the Mondstadt area.
What’s The Best Team For Barbara?
Despite Barbara’s personal versatility, she’s only generally used in either Fridge or Support comps since other characters can provide more value in a free-to-play environment.
Regardless, she’s a pretty strong pick, and the following comps make the best use of her in regard to her abilities:
1. Fridge Team
As the name suggests, this team relies on crowd control to win. You create a bunch of Dendro Cores, and freeze enemies in order to bridge the gap.
Kaeya
Kaeya | via IGN
As a 4-Star Cryo Sword character, Kaeya works pretty well in the Sub-DPS role due to her short cooldowns and damage multipliers.
Her elemental burst is pretty decent, and she can deal a fair amount of damage as long as you’re able to obtain her constellations.
She possesses a decent amount of energy to keep going after unleashing all of her attacks – making her the perfect fill-in for this comp.
Collei
Collei | via PCGamesN
She is a 4-star Dendro bow character capable of spreading reactions automatically with the aid of her Elemental Skill. Add the Quicken ability as a cherry on top, and she can pretty much solo carry the Dendro part of your comp.
Unfortunately though, her normal attack is quite weak, so you’d have to go for the ability outbursts in between parries.
Traveler (Dendro)

Dendro Traveler | via Game Rant
The Dendro Traveler is a 5-star sword character capable of dealing enormous amounts of off-field damage – making it a very good intermediary between offense and defense.
Pair it with its high investment high reward playstyle, and it’ll be the perfect catalyst to make Barbara shine.
2. Support Team
Barbara is a pretty good standalone support; she can be adjusted into almost every team comp. However, when it comes to balancing damage with tankiness, the following works pretty well:
Raiden
Raiden | via CyberPowerPC
As a 5-star character, there are little to no characters that can match Raiden in Electro Polearm damage. She is a must-have due to her high active and passive Electro DMG.
Raiden doesn’t need any help with regard to Energy management. Instead, she can also regenerate her allies’ Energy meters and Elemental Burst DMG.
She has no apparent weaknesses besides her inability to work with certain characters. Therefore, she’s perfect for the main DPS.
Yelan

Yelan | via Eurogamer
Yelan is a 5-Star Hydro Bow character capable of boosting your active character’s personal damage.
She possesses an insane quality of Talents and is the perfect Sub-DPS capable of toppling most main-DPS characters in a party.
Pair all of this with the Hydro resonance due to Barbara, and the team comp leaps levels in scariness.
Kazuha

Kazuha | via Sportskeeda
Kazuha is a 5-star Anemo Sword Character that’s widely known for his Swirl Damage and exploration prowess.
He can group up enemies with his Elemental Skill and can help set up large-scale damage combos.
His swirls can buff up your team’s already sky-high damage, making him a great Sup-DPS fit for this comp.
Barbara: Ability Rundown
Barbara is mostly reliant on her abilities to be of use in team comps. Therefore, familiarizing yourself with her kit is an integral part of finding success with her.
Having said that, here’s how her abilities operate:
Basic Attack: Whisper of Water
Barbara performs a total of 4 water splashes that deal Hydro DMG to the targets.

Whisper of Water | via Wiki
There’s not a lot associated with her basic blows since they’re meant to apply the weapon passives.
With that said, here’s how the damage scaling works for Whisper of Water:
| 1 | 2 | 3 | 4 | 5 | 6 | 7 | 8 | 9 | 10 | 11 | |
| 1-Hit DMG (%) | 37.84 | 40.68 | 43.52 | 47.3 | 50.14 | 52.98 | 56.76 | 60.54 | 64.33 | 68.11 |
72.05 |
|
2-Hit DMG (%) |
35.52 | 38.18 | 40.85 | 44.4 | 47.06 | 49.73 | 53.28 | 56.83 | 60.38 | 63.94 |
67.63 |
|
3-Hit DMG (%) |
41.04 | 44.12 | 47.2 | 51.3 | 54.38 | 57.46 | 61.56 | 65.66 | 69.77 | 73.87 | 78.14 |
| 4-Hit DMG (%) | 55.2 | 59.34 | 63.48 | 69 | 73.14 | 77.28 | 82.8 | 88.32 | 93.84 | 99.36 |
105.1 |
Charged Attack
Barbara takes a short second to cast an attack that deals AoE Hydro damage.
This attack consumes a fair bit of stamina, so it’s better to use it sparingly.
Here’s the damage composition for her charged attack:
|
Charged Attack |
|||||||||||
|
Charged Attack DMG (%) |
166.24 | 178.71 | 191.18 | 207.8 | 220.27 | 232.74 | 249.36 | 265.98 | 282.61 | 299.23 | 316.52 |
| Charged Attack Stamina Cost |
50 |
||||||||||
Plunging Attack
Barbara launches herself towards the ground from mid-air while damaging any opponent in her path.
The attack hits the ground in an AoE radius and deals Hydro damage to any enemy caught in that AoE.
Having said that, here’s the damage breakdown for Barbara’s Plunging attack:
|
Plunging Attack |
|||||||||||
|
Plunge DMG (%) |
56.83 | 61.45 | 66.08 | 72.69 | 77.31 | 82.6 | 89.87 | 97.14 | 104.41 | 112.34 | 120.27 |
| Low Plunge DMG (%) | 113.63 | 122.88 | 132.13 | 145.35 | 154.59 | 165.17 | 179.7 | 194.23 |
208.77 |
224.62 | 240.48 |
| High Plunge DMG (%) | 141.93 | 153.49 | 165.04 | 181.54 | 193.1 | 206.3 | 224.45 | 242.61 | 260.76 |
280.57 |
300.37 |
Let The Show Begin♪: Elemental Skill
The self-proclaimed idol summons a stream of water droplets that don the shape of musical notes.

Let The Show Begin | via Wiki
These notes deal Hydro DMG and apply the Wet status on enemies on impact.
Here’s what the Wet status entails:
- Barbara’s attacks heal your party members’ and allies’ HP on-hit. The level of healing depends on Barbara’s max HP.
- Barbara’s Charged attack applies the heal 4 times.
- Barbara’s self-HP is also healed periodically, while the opponents who come in contact with the Wet characters become Wet themselves.
On that note, here’s how its attribute scaling works:
| 1 | 2 | 3 | 4 | 5 | 6 | 7 | 8 | 9 | 10 | 11 | 12 | 13 | |
| HP Regeneration Per Hit | 0.75% Max HP
+ 72.2 |
0.81% Max HP
+ 79.44 |
0.86% Max HP
+ 87.27 |
0.94% Max HP
+ 95.69 |
0.99% Max HP
+ 104.72 |
1.05% Max HP
+ 114.35 |
1.13% Max HP
+ 124.59 |
1.2% Max HP
+ 135.42 |
1.27% Max HP
+ 146.86 |
1.35% Max HP
+ 158.9 |
1.43% Max HP
+ 171.54 |
1.5% Max HP
+ 184.78 |
1.59% Max HP + 198.63 |
|
Continuous Regeneration |
4% Max HP
+ 385.18 |
4.3% Max HP
+ 423.71 |
4.6% Max HP
+ 465.44 |
5% Max HP
+ 510.39 |
5.3% Max HP
+ 558.54 |
5.6% Max HP
+ 609.91 |
6% Max HP
+ 664.48 |
6.4% Max HP
+ 722.27 |
6.8% Max HP
+ 783.27 |
7.2% Max HP
+ 847.47 |
7.6% Max HP
+ 914.89 |
8% Max HP
+ 985.52 |
8.5% Max HP + 1059 |
| Droplet DMG (%) | 58.4 | 62.78 | 67.16 | 73 | 77.38 | 81.76 | 87.6 | 93.44 | 99.28 | 105.12 | 110.96 | 116.8 |
124.1 |
|
Duration |
15s |
||||||||||||
|
CD |
32s |
||||||||||||
Shining Miracle♪: Elemental Burst
This ability heals your allies for a considerable HP amount. The more HP Barbara possesses, the higher the potency of Shining Miracle.

Shining Miracle | via Wiki
Here’s the attribute scaling for Barbara’s Elemental Burst:
| 1 | 2 | 3 | 4 | 5 | 6 | 7 | 8 | 9 | 10 | 11 | 12 | 13 | 14 | |
| Regeneration | 17.6% Max HP
+ 1694 |
18.92% Max HP
+ 1863 |
20.24% Max HP
+ 2047 |
22% Max HP
+ 2245 |
23.32% Max HP
+ 2456 |
24.64% Max HP
+ 2682 |
26.4% Max HP
+ 2922 |
28.16% Max HP
+ 3176 |
29.92% Max HP
+ 3445 |
31.68% Max HP
+ 3727 |
33.44% Max HP
+ 4024 |
35.2% Max HP
+ 4334 |
37.4% Max HP
+ 4659 |
39.6% Max HP
+ 4999 |
| CD |
20s |
|||||||||||||
|
Energy Cost |
80 |
|||||||||||||
Barbara – Passive Talents
Barbara is a strong support – no doubt about that. However, the real breadwinners behind her strength are not her weapons and artifacts but her talents.
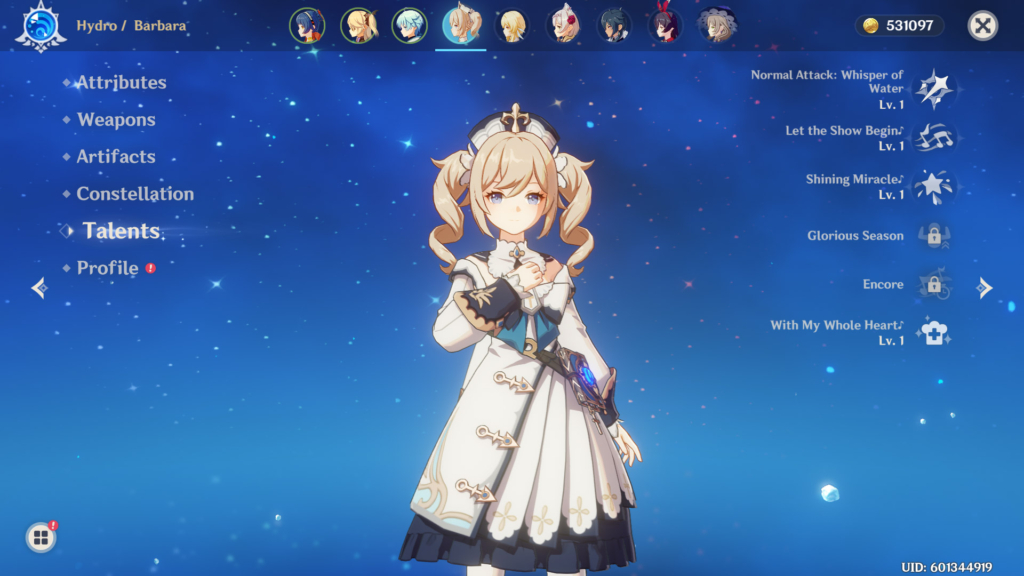
Barbara Menu | via Fanbyte
Here’s how they essentially work:
Glorious Season – Ascension 1 Talent
This talent reduces the Stamina Consumption of all allies within Let the Show Begin♪ by 12%.

Glorious Season | via Wiki
This only works in the Melody Loop, so try to use it as a backup battery.
Encore – Ascension 4 Talent
This talent allows you to extend the duration of Let the Show Begin♪’s Melody Loop by 1 second for every Elemental Orb/ Elemental Particle you obtain.

Encore | via Wiki
This talent only works while the Melody Loop is active.
With My Whole Heart♪ – Automatic Unlock

With My Whole Heart | via Wiki
Whenever you achieve perfect cooking on a dish that already has restorative effects, you have a 12% chance of obtaining a double harvest.
Barbara – Constellations
Like any other character in Genshin Impact, Barbara’s kit comprises six unique constellations meant to provide a roundup to her as a support carry.

Barbara Constellation | via Zeldrys04
Here’s how they work:
Level 1 Constellation – Gleeful Songs
This constellation regenerates your Energy points by 1 for every 10 seconds.
Level 2 Constellation – Vitality Burst
Vitality Burst decreases the cooldown time of Let the Show Begin♪ by a total of 15% while also granting you a 15% Hydro bonus for the duration of the ability.
Level 3 Constellation – Star of Tomorrow
Shining Miracle♪’s level is increased by 3, with the upgrade level cap being 15.
Level 4 Constellation – Attentiveness be My Power
Barbara regenerates 1 Energy for every character hit by her Charged Attack. So in total, one charged attack can yield up to 5 points of Energy.
Level 5 Constellation – The Purest Companionship
Let the Show Begin♪’s level is increased by 3, with the upgrade level cap being 15.
Level 6 Constellation – Dedicating Everything to You
Whenever one of your party members falls – with Barbara in your party, he/she gets a free revive.
This ability is automatic, and the revived character’s HP is restored to full. This ability has a cooldown time of 15 mins.
Barbara’s Ascension: Stats And Material Costs
Here are all the ascension bonuses and material costs associated with leveling up Barbara to reach maximum output:
|
Ascension Phase |
Level | Base
HP |
Base
ATK |
Base
DEF |
Special Stat |
| 0✦ | 1/20 | 820 | 13 | 56 | — |
| 20/20 | 2108 | 34 |
144 |
||
Ascension Cost (0 → 1)
 Mora | via Wiki 20,000  Varunada Lazurite Sliver | via Wiki 1  Philanemo Mushroom | via Wiki 3  Divining Scroll | via Wiki 3 |
|||||
|
1✦ |
20/40 | 2721 | 44 | 185 | — |
| 40/40 | 4076 | 66 |
278 |
||
| Ascension Cost (1 → 2)
Mora | via Wiki 40,000  Varunada Lazurite Fragment | via Wiki 3 Philanemo Mushroom | via Wiki 10 Divining Scroll | via Wiki 15  Cleansing Heart | via Wiki 2 |
|||||
|
2✦ |
40/50 | 4511 | 73 | 308 | 6.0% |
| 50/50 | 5189 | 84 |
354 |
||
| Ascension Cost (2 → 3)
Mora | via Wiki 60,000 Varunada Lazurite Fragment | via Wiki 6 Philanemo Mushroom | via Wiki 20  Sealed Scroll | via Wiki 12 Cleansing Heart | via Wiki 4 |
|||||
|
3✦ |
50/60 | 5770 | 93 | 394 | 12.0% |
| 60/60 | 6448 | 104 |
440 |
||
| Ascension Cost (3 → 4)
Mora | via Wiki 80,000  Varunada Lazurite Chunk | 3 Philanemo Mushroom | via Wiki 30 Sealed Scroll | via Wiki 18 Cleansing Heart | via Wiki 8 |
|||||
|
4✦ |
60/70 | 6883 | 112 | 470 | 12.0% |
| 70/70 | 7560 | 123 |
516 |
||
| Ascension Cost (4 → 5)
Mora | via Wiki 100,000 Varunada Lazurite Chunk | 6 Philanemo Mushroom | via Wiki 45  Forbidden Curse Scroll | via Wiki 12 Cleansing Heart | via Wiki 12 |
|||||
|
5✦ |
70/80 | 7996 | 130 | 546 | 18.0% |
| 80/80 | 8674 | 141 |
592 |
||
| Ascension Cost (5 → 6)
Mora | via Wiki 120,000  Varunada Lazurite Gemstone | via Wiki 6 Philanemo Mushroom | via Wiki 60 Forbidden Curse Scroll | via Wiki 24 Cleansing Heart | via Wiki 20 |
|||||
|
6✦ |
80/90 | 9109 | 148 | 622 | 24.0% |
| 90/90 | 9787 | 159 |
668 |
||
Barbara: An Idol’s Healing Magic: Lore & Ability Showcase
Here’s the official showcase of Barbara’s capability:
How to Obtain Barbara?
Barbara is obtainable from the following sources:
- Standard Wish Wanderlust Invocation: There’s always a minuscule chance of obtaining Barbara here.
- Beginner’s Wish: You have a chance of obtaining Barbara within all the 20 wish chances.
- Character Event Wishes: Indefinite Chance
- Baptism of Song: Indefinite Chance
- Barbara’s Shining Debut Event: Indefinite Chance for the duration of the event (September 28, 2020 – November 11, 2020).
Paimon’s Bargains
Shop: Paimon’s Bargains | via Jin Yuan
Aside from the mentioned sources, Barbara was also periodically available within 4 of Paimon’s Bargains Starglitter Exchange:
- December 2020 Exchange
- June 2021 Exchange
- December 2021 Exchange
- June 2022 Exchange
Looking at the above data, it won’t be difficult to predict the next availability of Barbara.
Drop Rate Boosts
Barbara has shown herself in 9 event wishes with a drop-rate boost:
|
Wish |
Duration |
 via Wiki Ballad in Goblets 2020-09-28 |
September 28, 2020 – October 18, 2020 |
 via Wiki Dance of Lanterns 2021-02-17 |
February 17, 2021 – March 2, 2021 |
 via Wiki Farewell of Snezhnaya 2021-04-06 |
April 6, 2021 – April 27, 2021 |
 via Wiki Sparkling Steps 2021-06-09 |
June 9, 2021 – June 29, 2021 |
 via Wiki Oni’s Royale 2021-12-14 |
December 14, 2021 – January 4, 2022 |
 via Wiki Discerner of Enigmas 2022-05-31 |
May 31, 2022 – June 21, 2022 |
 via Wiki Invitation to Mundane Life 2022-05-31 |
May 31, 2022 – June 21, 2022 |
 via Wiki Twirling Lotus 2022-10-14 |
October 14, 2022 – November 1, 2022 |
 via Wiki Secretum Secretorum 2022-10-14 |
October 14, 2022 – November 1, 2022 |
Conclusion
All in all, Barbara is a pretty scary support to battle against solely because of her healing. She excels in a drawn-out battle due to her regeneration but is pretty weak – unless paired with a DPS carry or a Dendro comp.
This is the build that we recommend for Barbara in Genshin Impact. If you want to learn more, then you can check out our guide on where you can find Cor Lapis in the game.


