
Borderland 3 has plenty of side quests on each planet that you can check out. In this Borderlands 3 guide, we will walk you through all the side quests available on Promethea. We will cover how you can unlock different side quests on Promethea, how to complete them, and different steps required in getting additional rewards in Borderlands 3.
Borderlands 3 Promethea Side Quests
The following are all the side quests on Promethea and how you can complete them in Borderlands 3.
Healers And Dealers
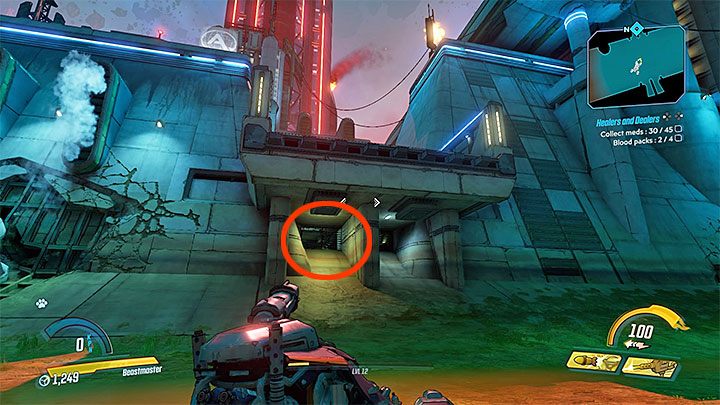
This is the first of the many Borderlands 3 Promethea Side Quests that you can check out while playing the game. Start by getting to the pointer marked at the region of Meridian Outskirts. Multiple locations related to getting the Blood Packs and Meds at Dr. Ace Baron’s clinic will be marked in this mission.
For getting the first batch of meds, you will have to destroy the vehicle of the enemy that is marked in the game and it can be destroyed by using any weapon. For getting more meds, you will have to get to Hardin. Start climbing by reaching the base and grabbing the ladder. It depends on you if you wish to complete the optional objective by paying 1,000 credits for the Meds or frighten him.
In the end, you will have to visit the monster’s lair. Kill all the ratch monsters, while eliminating them, a badass ratch will come across. Once all the monsters are killed, get to the big white chest with a cross on it. You can take everything it has in it.
Now return to Ace Baron and place the meds there on the wooden box. Press the melee button once you attach the empty blood pack with the doctor’s hand. Pass this filled up blood pack to the doctor for completing the quest.
You will get credits, XP, and a rare shield (if only you pay Hardin for the Meds after the optional goal is completed).
Maliwannabees
Go to the exclamation pointer in the region of the Meridian Outskirts (converse with Ziff). Get to the scene of the crime. Listen to the radio when you get to the corpse. Burning supply vehicle is the other place of investigation. On the radio, you will be guided by Rax and Max using the radio.
Find the elevator for reaching the upper level of the Bandits’ hideout. You will come across two bosses while fighting regular enemies, Rax and Max. Fight only with one of them. Try and avoid being attacked by the second mini-boss. Before you do some damage to each of these bosses, you will have to destroy their shields.
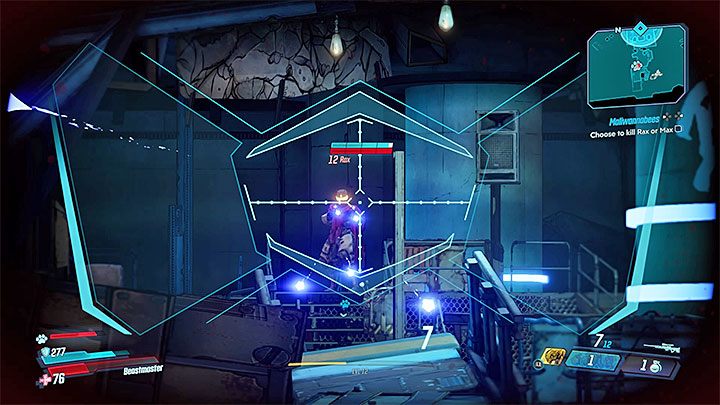
Once the mini-boss is dead, the other one will become neutral and will not attack you anymore. When you will move away, you will get a message from Ziff. You will have to return to the bandit’s hideout for killing the other mini-boss, as per her suggestion. The other mini-boss will start attacking right when you get there.
Finish the mini-boss and return to Ziff. You will get credits and XP. In case both the mini-bosses are killed, you will be able to get extra credits.
Rise and Grind
Talk to Lorelei after the Watershed base is acquired in the region of Meridian metroplex. When you get to the Rise and Grind cafe, call the barista bot.
Move towards Core Daddy’s area when you have heard about the problem. It’s a stronger variant of the other Heavy opponents. You may also find different heavy unit types in the surrounding location. You might get serious injuries if one of the armored enemies jumps in the air, so steer clear of that regardless of whoever you are attacking. After having the Power Core, get back to the Rise and Grind cafe, once you finish and win the battle. Put the core in the large vertical device.
For resetting the Barista Bot, press the button. However, he has some other problems. You have to get to the location where there is the Maliwan Commander. Here you will have to fight a bigger fight, and these are not just any regular enemies, these are elites. Look out for the enemies with different names and heavy armors.
Your target will have Coffee Runner in its possession. You have to take his To-Go Cup by shooting him and killing him.
Once you have the cup, return to the cafe. There you will encounter another group of opponents who have to be killed. Their Badass varieties are what you should be looking out for, they are extremely dangerous. Once you are done with the fight, put the cup on the counter. You have to wait for the bot to fill it up and pick the Filled To-Go cup.
Giving the cup to Lorelie at the Watershed base is not where the mission ends, as there is another big battle coming up. It is the comfort of knowing that you can rely on allied soldiers’ help while you are in the battle. You can kill your current enemy while more enemies will arrive on their transports.
Coffee Commander will be using very heavy armor and is also the strongest opponent. Once you end the battle, you can talk to Lorelie for ending the quest. When the quest ends, you will get credits, XP, and a rare shield.
Dynasty Diner
Next up in out Borderlands 3 Promethea side quests guide, we have the Dynasty Diner side mission. In the region of Meridian Metroplex, talk to Lorelie after the Rise and Grind quest is completed.
This will be the second mission you receive from her and it is about supplying food to the soldiers. For meeting Beau, you have to move towards Dynasty Diner. When you are getting there, you will get a message, mentioning to get back the control. You can’t drive vehicles in there, so you will fight with all the enemies yourself.
On a board dropship, the Maliwan soldiers will start arriving. The board is unable to be shot down or destroyed. While fighting keep an eye out for the Badass and the Heavy’s enemies. Before getting to the staff area, clear out everything, and then press the button. You will know what you need for preparing the meal.
After that, go to the Sewers, the already specified location. You have to take care of the Ratch monsters that are attacking. Ratch Larva creatures leave meal ingredients behind, you are looking for them. Once you acquire 3 of these Ratch Larva creatures, you have to kill the Ratch Nest monster. It is a powerful creature, but its attacks are not that strong. Once it’s killed, take the Ratch Meat.
On the Digiscanner, put the meat by returning to Diner Dynasty and summon the Burger Bot pressing the button.
Another quest goal will make you follow the Burger Bot. Try and stay near the bot, as it will wait for you in case you get out of its reach. On your way, you will have to clean the way for the bot by destroying multiple opponents. Among them are also going to be some ordinary enemies but fighting with Badass, Heavy, or NOG opponents can also be expected.
The last fight will begin once you get to one of the alleys. You have to kill the Maliwan bots which are led by the Archer Rowe. Once the battle starts, it is a better strategy to stay a few steps back so the enemies won’t attack the hero from multiple sides.
Specifically avoid Archer’s jumps, because he uses heavy armor. A Dynasty Meal will be left behind the defeated enemies and others, which is to be taken to Lorelei. You will get a rocket launcher, credits, and XP for as a reward after you have completed this quest.
Kill Killavolt
In the region of Meridian Metroplex (bulletin board), there is an exclamation mark. Get there.
This task will be commissioned by Moxxi in the nearby area of Lectra City, you will have to meet her there. For this mission, it is better if you wait till level 15-16. There will be a passage marked to Lectra City on the map. On your way, you will come across many enemies, but they can’t stop you from skipping and escaping them.
Climb the stairs by pressing the button in Lectra City. Learn about local battle Royale’s rules from Moxxi.
Before fighting Killavolt, there are some things that need to be done. The first objective includes killing three mini-bosses.
- Trudy the Toe-less
- Jenny of Raden-3
- Lena of Eden-6
The fighting pattern for all these mini-bosses are more or less the same, but they are located in different map parts. To avoid getting hit by these bosses, always keep moving and running as they use good distance weapons. After all the battles are won, loot the Killa Token by finding the body of the boss. This will get you 3 required tokens out of 4.
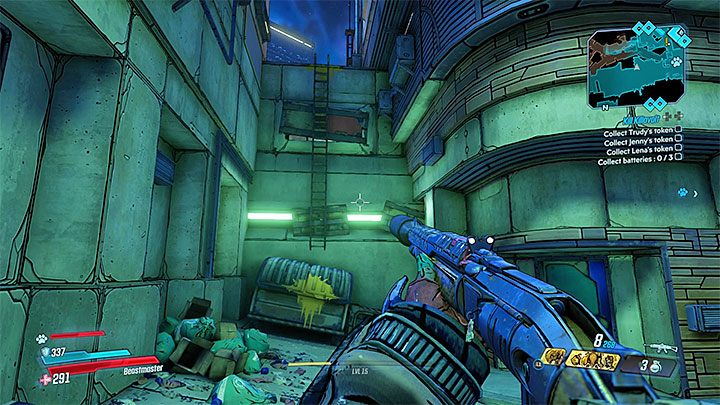
Other than looting these tokens, you will also need 3 batteries which are available in different areas of the city. On the roofs, you will find 2 out of 3 hidden batteries. When you get close to a battery mark, look for ladders and start climbing up. The hero can also climb up to higher shelves by jumping onto the other ladder.
The easiest way to get to the third battery, which is available on the docks, is by jumping on the containers. Avoid contacting the water. It has caustic and damaging properties which will result in the damaging health of the hero. You will have enough time for climbing onto the containers or other bigger objects.
When all goals are completed, move to Moxxi Bar. Hand her the batteries and wait for the trap to be prepared by her. Once she is done, receive Moxxi’s Booby-Trapped Token.
Restore your health and ammo or visit the vending machine before heading over to the next phase of the mission. There is going to be a big fight with the side bosses. Get to Killarena. Killavolt lives in the arena of Bone Zone, enter there. Give Moxxi trap tokens and mini-boss tokens to him. The combat will start once the Killavolt’s force field token is disabled.
All these attacks are electricity-based and come in multiple forms. Lightning is preferred by Killavolt as an attack. Electrical missiles are also a boss’s ranged attack that uses electricity for shocking you. In both cases, your strategy should be to keep moving.
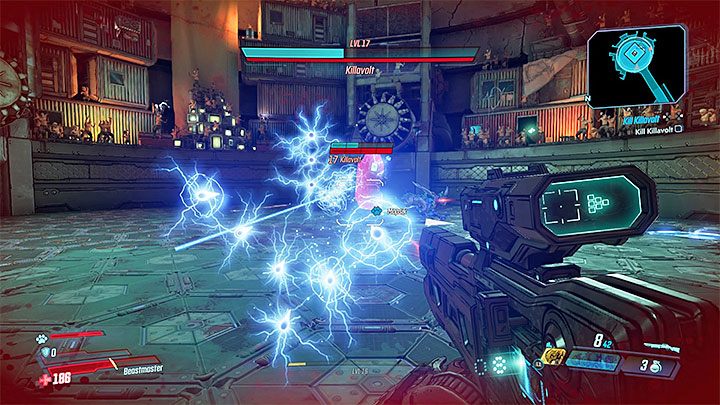
Keep in mind that the electrocution of the floor tiles is the most common and serious type of boss attack. You should run when the plates are electrically charged. If you want to keep moving, you can jump over the floor plates that are electrified. Do the same when a larger area is charged temporarily and you have no place to run.
Killavolt’s large shield protects him in the battle and makes it very hard to effectively attack him. Even if your attacks move past his shield, they will not have enough strength and will do minimum damage. Try and attack it from the back or the sides. You can also attack when he is preparing to perform the electric tack and is intentionally exposed.
If you play this battle in the cooperation mode, it would be easier to win as one of the players will keep the boss distracted, giving you a better chance to attack more often.
Don’t forget, the regular mobs will appear randomly. When it is not required, don’t attack the boss vanguard and adds. As with most of the other difficult battles, they can help you to restore your character back (Second Wind) after it knocks down (Fight for Your Life).
If you are playing alone, it is going to be a long fight with Killavolt. Once it is defeated, it will leave loot which will include credits, eridium, and some new items. For finding the Killa pack – the quest item, you have to explore the body of the boss. After talking to Moxxi in the end, you will get credits, XP, and a cosmetic item.
Technical NOGout
In the region of Meridian Metroplex (bulletin board), there is an exclamation mark. Get there.
For meeting the Scientist, Quinn, you have to get back to the Meridian Outskirts. Kill the Malawin’s troops when you have gotten to the lab. Walk towards the door that is very noticeable and knock on it, Quinn will be hiding.
Converse with Quinn and start moving towards the vehicle station. In this mission, there is a NOG catcher vehicle available, get in it. Once you see the enemy on the Runaway NOG, hit the button for using the catapult as a weapon. If hit successfully, you will be allowed to catch a NOG (particular one), collect all three of them, and then go back to Quinn.
Head to the post that is summoning the NOG. The first few experiments are going to result in failure. However, only the third and last one will become a success.
At the end of this quest, you will become a part of the fight with the Maliwan soldiers and the bots. You must always have time to kill your enemies as they will move quickly in Quinn’s lab. You need to pay attention to keeping the hero and the team alive because Quinn is not technically in any danger.
In the ending phase, you need to focus on a stronger enemy that has the power of making huge damages, Badass Protector Heavy. After the fight, credits, XP and a rare Grenade Mod can be collected after the quest is completed.
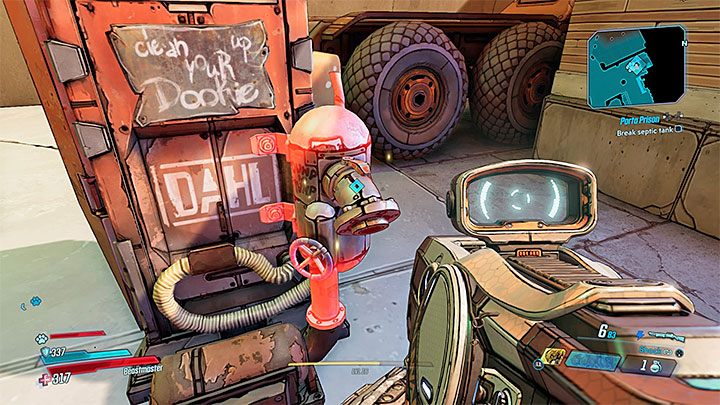
Porta Prison
In the region of Lectra City (portable toilet), there is an exclamation point marked. You have to get there.
In the sewers is the crew meeting point of The Trashmouth, get there through the path that can be revealed. When the enemies are nearby, they will attack the hero. Kill them while looking for their boss/leader named Badass. Find the can of Spray Paint after the fight.
You have to have 6 graffitis painted, get to the point where you can paint those. Then reach the final graffiti destination by climbing the roof of the lower building.
There is going to be a powerful Sheriff Bot in the area. You can destroy its yellow bar only if you have depleted its blue bar first. The lost bot is going to drop an AI Chip. Install it on the portable toilet’s wall where Tashmouth is hiding.
Next bots are relatively weaker and will be much easier to eliminate. After completing this battle, a new goal will be received. It is about damaging the Septic Tank. Do a melee attack by approaching him. Use a weapon of your choice and destroy the Recycler Bot once it appears. Install the other AI Chips that you will pick up. The portable toilet will vanish.
Now you have to look for Trashmouth, which means traveling to the region of the Meridian Outskirts by using any vehicle. You have to destroy the vehicle of Trashmouth, Trashmouth’s Technical.
Shoot him using any available weapon. When the machine will explode, a mission item will be left behind – the Illegal Weapon. You will end the mission by picking the gun up and will get credits, XP, and a remarkable rocket launcher.
Proof of Wife
In the region of the Lectra City (notice board), get to the exclamation point.
In the sewers, there is a bandit’s safe house, you have to get there. As described in the side quest of Porta Prison before, you can use the same sewer descent. Get freed of the Deputy Bots that live in the house. Enter inside and start listening to the conversation after the button is pressed.
Get to the Police HQ and use the intercom and eliminate the Deputy Bots by getting to the detention center. Among them will be some Sheriff Bots, which will be much stronger and will have two energy bars, a blue and a yellow one. Firstly, you have to kill the first one because only after that the yellow bar can be decreased before the renewal of the shields.
Once the fight is over, go to the place where there is Bloodshine. Kill the character when it attacks the hero. Once it is killed and you have won, take off the mask from the loser thug – Bloodshine’s Mask.
Get back to where you were hiding, inside the sewers. Put the mask you just got on the body that is hanged at the entrance. You will find a hidden entrance opening, and from there onwards there are a number of battles that you will have to fight. Go on by killing Bloodshine’s friends first.
There are different mini-bosses in different areas of the hideout, namely Bloodshine’s Best Man, Bloodshine’s Mother, and Tumorhead. If you get surrounded, don’t stop moving. Keep running, in spite of knowing about the small area size.
Free Naoko by using your melee attack when you reach your cell after winning the fight. You can only win the battle by fighting and killing the stronger bandits one by one. End the quest by listening to the conversation. This will result in credits, XP, and a sniper rifle.
Opposition Research
In the region of Skywell-27, which was first visited in the main quest of Space-Laser Tag, there is an exclamation mark, get there.
The whereabouts of Gonner Maleggies will be marked on the map. On the left main entrance gate of the base, in a large shaft, you will discover Gonner. It is better to meet him in the Space-Laser Tag main quest.
You will have to get the Katagawa Intel from 3 different locations (these will be specified on the map). The first area is a bloody public toilet that needs to be checked. Check and inspect the body covered in blood and go after the blood trail. It will take you to a cabin. You will discover the Katagawa ECHO Log by picking up the toilet bowl.
A room where another murder took place needs to be explored. This is the next location. Inspect the body. A mini-boss which will be called Interrogator will appear when you try opening the locker.
Get the Key to Locker by killing him and looting his body. You will acquire the key, Katagawa ECHO Log, by opening the locker.
You will have to kill the Maliwan troops and explore the third location. Keep an eye out for the flying spheres, in addition to the soldiers. Despite being small in size, they can harm you. Once the combat is over, pick the next audio journal (Katagawa ECHO Log) up, by going to Undercover Atlas Agent.
At the end of this mission, open the Datacenter area’s door. Try to get in the computers by entering the password and interacting with the central computer. Here you will come across a few fights:
- Keep an eye for the heavy opponents, in the first fight. Here you will have to kill the Maliwan soldiers.
- COV fanatics are to be defeated in the second fight. Look out for the suicide bombers.
- Get to the speaker activation point after winning the second fight. There are multiple opponents to kill. However, Heavy and Badass opponents are to be looked out for.
There is an advantage in these battles. You can hide behind poles and travel between different floors, for example, for renewing your shields. Get to the Atlas Data Transfer Station, after fighting and winning the battles. Once done, you will receive a legendary Weapon Trinket, credits and XP as rewards for completing the quest.
Ratch’d Up
This is the last of the Borderlands 3 Promethea Side Quests. After you have completed the Atlas, At Last quest, converse with Rhys in the region of Atlas HQ. Once the main quest at Atlas is completed, you will see an exclamation mark over Rhys’ head. Now you have to find Terry, it will be another task assigned to you. Go to the marked location using the elevator.
You can go to the office of Terry by using the passage that is recently unlocked. There, look for the secret button, it can be found on the wall. Once you find it, press it. It will unlock a secret gateway.
There are various Science diary audio logs of Terry available in the Skunkworks Lab. You can collect them, but that is optional. It will not result in any rewards. Move towards the door and start listening to Glenn’s conversation. Tell him the situation.
Move towards the opening the door, there you will be given the task of securing the lab, so both large and small Ratch monsters can be killed. Among these, the strongest are Badass Ratch Broodmother Ratch. After the fight is complete, converse with Glenn after finding out that his awareness is in the body of the insect by pressing the button.
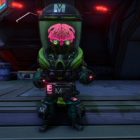
Follow the insect Glenn to where the body of Terry is. Pull the lever by returning to the big room once you have acquired Terry’s Brain. Get to Garry’s pit by jumping onto a lower level. There, eliminate Garry, it shouldn’t be difficult.
Move towards the room where Garry’s brain needs to be placed on a certain device. By using the console, restore Terry even if he is in an insects form. After all objectives are completed, get back to Glenn. You will get an epic pistol, credits and XP as rewards after you have completed this quest.
That is all for our Borderlands 3 Promethea side quests guide. If you are interested in learning more about the game then you can check out our guide on all the Pandora side quest missions and how to complete them.