
Borderland 3 has plenty of side quests on each planet that you can check out. In this Borderlands 3 guide, we will walk you through all the side quests available on Eden-6. We will cover how you can unlock different side quests on Eden-6, how to complete them, and different steps required in getting additional rewards in Borderlands 3.
Borderlands 3 Eden-6 Side Quests
The following is what you need to know about all the Borderlands 3 side quests that you can check out on Eden-6.
Don’t Truck with Eden-6
Investigate the dead body lying on the road by getting to the exclamation point in Floodmoor Basin.
Converse with Miller by getting to Pure Gas station. For this mission, you will need a car, it could be any, that Catch-A-Ride station can summon. You can start the quest by destroying Bloodflap gang’s 2 vehicles. With any weapon that is onboard, shoot at their cars.
In the next phase of this mission, you have to kill Bloodflap himself. You will be able to see the area of the Inquisitor Bloodflap in the game and his vehicles that travel through the entire map. You can either go after him or wait for him to pass by your area. After the vehicle is destroyed, return to Miller. You will get credits, XP, and a pistol which is epic as rewards for completing the quest.
Get Quick, Slick
Go to the point of the exclamation mark in the Floodmoor Basin (message board).
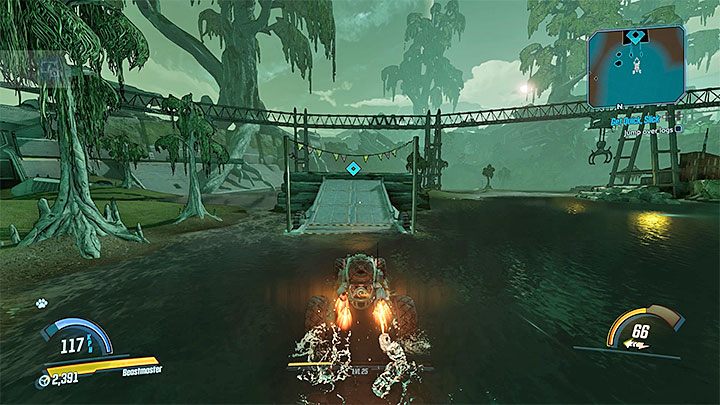
A vehicle will be available – Prisa’s Outrunner, for the quest when you get to Slickhouse Garage. It has no weapons but offers a nitro boost that can be used for performing tricks or feats.
At the start of this mission, you have to jump on the five ramps specified on the map. While jumping, the speed with which you are jumping will not matter. You will jump over the wooden logs in the next stage of this mission. You can only get successful by hitting the ramp with high speed on either side. Head straight to the ramp by activating the nitro a minimum of two times while in the phase of run-up.
If your car rolls over, try flipping it back or use explosives for moving it. Get back to Catch-A-Ride station for another car, if your car has been destroyed.
Two back to back jumps are to be made in the next stage of this quest. It is important that the ramp is hit with high speed. If you are unsure about the second jump, take a break and pause for a while on the first island, then using the nitro boost, gather as much speed as possible.
You are on Lonesome Isle, look around for finding a parked Pops’ Outrunner. Use any weapon you like when Prisa tells you about destroying a vehicle. You can use a shotgun, grenades or launcher, etc. Finally, explore the fridge that has some loot. XP and credits will be the reward for this quest.
Sadly, the collection cannot be joined by the Prisa’s Outrunner, so don’t try driving to the rectangle that is found at the stations of Catch-A-Ride.
On the Blood Path
Talk to Ramsden by getting to an exclamation point in the region of The Anvil.
In the region of The Anvil, which you visited the first time in the main quest of the Hammerlocked, you can find Ramsden. Move towards the specified doo after conversing. Check all three containers while searching the lodge. Among them will be the Prison Gate Key.
Go to Shankland by opening the gate. Kill the Shanks and different thugs. Be careful about the enforcers and the Tink Sentries. Make sure to wait for them so that they can show themselves.
When you are closer to Holder’s cell for examining the body, press the button. Move the metal sheet and you will find a secret hidden pathway. Fight with the new opponents and get to the location where there is Holder. You will get to know that he is the “good” one by listening to his version. There are two ways for completing this quest:
-
- Team up with Holder – Converse with him and then have a battle with the men of Ramsden and himself. You will get an epic shield, credits, and XP.
- Team up with Ramsden – Get to the doors that are marked and start opening them. Engage with the men of Holder and himself. Other than credits and XP you are also going to get a rare shotgun as rewards.
Witch’s Brew
Have a conversation with Murl by getting to the exclamation point in the region of Jakobs Estate.
Talk to the witch Azalea using the open pipe by getting to the specified camp. You have to follow Pippie, it will take you to Grotto. There you have to have a fight with the monsters, in which you will discover a Tyrant, it resembles a T-Rex. Try to run as much as possible during the fight so that the Tyrant can’t get to you. Fortunately, Pippie is safe.
Get to the place where Pippie stops. Gather 3 Green and Red Swamp Blooms.
Put the green flowers in the cauldron by going back to the witch. You will know about the witch’s betrayal and actual identity. Mutated Tink needs to be defeated. Always keep moving and keep your enemies at a distance.

Return to Murl. Put the red flowers by getting to the red cauldron. Taking the active slots by Murl, place the unique burning black flame shotgun in it. Shoot the first cauldron of Azalea using the new shotgun. For succeeding, it is a must for the quest weapon to be used.
GO into The Unhallowed Bog. Use the Burning Black Flame shotgun for destroying the newly found cauldrons. Once the active weapon is set as the shotgun, only then the cauldrons will appear on the map. You can also use different weapons for destroying the enemies.
Keep moving faster from one cauldron to another. While moving, don’t forget about the Mutated Tanks as their attacks are dangerous and can do some serious harm. In the end, you will have to face Azalea, which is a very weak opponent. Meet Murl, after you have completed all the goals. You will receive credits, XP and an Epic Grenade Mod. Depending upon you, you can either sell or keep the unique shotgun.
Sacked
In Jakobs Estate regions, go to the exclamation mark and thoroughly check the inside of the closet.
While exploring Jakobs Estate, the main quest part of Lair of the Harpy, you will find a closet that will be marked with an exclamation mark. Open the closet, a dead body will fall out. It will be of the butler who was murdered. For starting the quest you will have to examine it.
Be inside the same room where the mission started. To reveal a green button, go near the bust and have an interaction with it and then press it afterward.
Opening Jakob’s chest, which contains 3 locks, is the next objective. Explore the area specified on the mini-map. Look out for more busts that have shields over them. Using any firearms, start firing at the shields. Take the recording out – A Talk Between Aurelia and Baldrin – of the chest by opening it once all shields are destroyed.
Get to the service quarters once you have listened to the recording. You will discover a new item – Eviction Notice – in the corpses.

Another area that needs to be explored is the basement. After defeating one of the main bosses – Billy The Anointed – you will get there. Look upwards and get there by jumping over the barrels and take A Poem Filled with Love.

Kill all the enemies in Grotto. Be careful there can be a Tyrant among them.
In Grotto, there will be 2 items of the quest. For picking up A Shopping List, you will have to climb the rocks and pick it up, it is very well-hidden. Pink Slip is the second item, which is on a small box.
Being immediately close to the fast travel point in the Jakobs Estate is the hut of Clare. You have to get there. You can also use the advantage of teleporting to this location.
Finally, the swamps is going to be a hut, get there. It would be controlled by Badass Goliath. Attack from afar and always keep moving in the open area. Move the bed in the hut after finishing the battle. Take A Recording Between Troy and Aurelia out of the small container by opening it, then get back in Floodmoor Basin to Wainwright for completing the quest. XP and credits are the rewards after you have completed the quest.
Malevolent Practice
In the region of Floodmoor Basin, talk to Hammerlock after you have completed the main quest of Lair of the Harpy and then get to the exclamation mark.
Return to the region of The Anvil after listening to Hammerlock’s briefing. Expect face to face (respawned), opponents. Jensen’s ECHO Log is the first trace where you will be taken to.
You will come across a few strong opponents on your way – Anointed X-2 and Anointed X-3. They become temporarily weak when they are present in the surroundings of the force field, so avoid attacking them then. It is also important to kill the enemies one at a time. Every Anointed that loses is going to become a purple chunk. Break it for getting the loot. The second track is going to be around the things that you saw around the shattered Anointed X-2.
Check the dead bodies on the landing spot after you have dealt with new opponents and the other mini-boss – Anointed X-4, will be respawned. Keep an eye out for the lava that is appearing on the floor and the fiery attacks. After the Anointed turned into a chunk of purple color, smash it. You will get Beckett’s ECHO Log.
For finding the last track, you have to visit the nearby prison. Take the Dean’s ECHO Log from the empty cell and start looking for Dean. Search the new location that was previously unavailable when you visited The Anvil. Deal with a new mini-boss – Anointed Alpha – after talking to Dean. React to the boss’s actions by using powerful weapons. Make use of the console for releasing Dean and once you have won, shatter the chunk. You will get credits, XP, and an epic pistol as rewards.
Irregular Customers
In the Floodmoor Basin region, go to the exclamation mark. In Reliance city, on the notice board, you will be able to get a new mission. During the main quest of The Guns of Reliance, you will recapture this place.
The Witch’s Peat which is available near Knotty Peak is where you will start your journey from. You will come across some Jabbers on your way. These are not going to be very strong but can attack from high places and trees. Attack Apollo from afar when he joining the fight. Before weakening the red health bar, destroy the yellow bar first.
A quest item will be dropped from the monster that is just killed. The quest item will be Coolant Valve. Install it by getting to the designated device.
Getting to various 3 levers and switching every one of them is the new mission objective. You can find one lever on the top shelf. Jump towards the shelf and while you are in the air for climbing, press the jump button again.
Get ready for facing extremely powerful opponents/enemies – Badass Jabber, Rad Jabber, and Artemis. Kill the mini-bosses as soon as they appear focusing on one at a time. You will get credit and XP as a reward.
Capture the Frag
In the region of Floordmoor Basin, go to the exclamation pointer. In Reliance city, you have to converse with Clay. This place will be recaptured during the main quest of The Guns and Reliance.
You have to be at the camp where there are bandits from Team Tyreen present. You need a vehicle to get there. You should not have any problems getting rid of most of the bandits. You need to be careful for God-Queen’s Chosen enemy as it makes use of a rocket launcher.
For transporting to a mine, you have to get to the lever once all the enemies are eliminated. Push it randomly. You can do this by aiming for the mechanism that holds it. You can follow the mine on foot. You don’t need to worry about it moving away from you or getting destroyed before its time.
After reaching the new camp, start killing the thugs from Team Try (entrance of the camp is right by the vending machine). Use stairs to get to the top of the camp once the lower part is secured. Once it is secured, you have to kill another mini-boss, God-King’s Chosen.
For dropping the mine, you have to get to the lever. It is not entirely going to explode but a large amount of loot will become available near it. For completing the quest, converse with Clay. You will receive credits and XP for completing the quest.
Dynasty Dash: Eden-6
In the beginning, go to the region of The Floodmoor Basin and in there to the exclamation mark. This quest can be obtained from the notice board in the Reliance city. This place is going to be recaptured during the main quest of The Guns of Reliance.

Pick up the burgers and begin the quest, the time limit for this quest is 10 minutes. The objectives of the optional missions are the deliveries of burgers in a time duration with 9 minutes, 5 minutes or 2 minutes and 30 seconds to be spared when the quest completes.
Other than planning the routes and driving fast, your chances can increase if competition’s red signs can be destroyed on your way. Every signboard that is destroyed will help in increasing the time for completing the quest. This is in no form going to be a big bonus, so try shooting the competition without halting the vehicle.
If you are unable to complete the mission in 10 minutes, you will have to start from scratch. Using an outrunner with an improved accelerator is recommended. We have used the Razor Wings booster as an example.
Look for a green spot, every time you reach the spot that is marked. That is the place where burgers are to be dropped. You don’t have to fight with the opponents, including the Badass Psycho, who appeared in point 1 on the map. For putting the burger, make use of the interaction button and return to your vehicle immediately.
You will get the reward by returning to the Dynasty Diner’s employee in Reliance only if you do this in 10 minutes. All the additional objectives that are completed will give you additional credits. Repeating this mission is possible, however, the objectives will not change. You have to deliver the burgers at the same spot every time this mission is played. You can get more credits and XP by using this quest.
Swamp Bro
For starting this quest, go to the exclamation mark in the region of the Floodmoor Basin region. In Reliance City, talk to Chadd. During the main quest of The Guns of Reliance, you can recapture this place.
Follow Chadd, he will always wait for you. As the path needs to be climbed and jumped. You will get Grog Guts when you eliminate the three Grog monsters by reaching the swamp. Give the items you have collected to Chadd. Kill the three Ravagers and continue your journey. Chadd gets injured during the fight, go to him while holding the interaction button to use Second Wind.
Don’t stop moving. When you get to the cliff’s edge, you have to get to the location from where jumping into the abyss – Lover’s Leap – is possible. Start by jumping towards the lower shelf and then take the ladder to climb up the ledge – this is from where you have to jump. Chad needs to be revived once again when you have landed.
Collecting Fuel Cans is going to be the next objective. All of these cans are marked and are easily accessible. Return to Chadd and at the bottom of the big elevator, install the fuel containers on the boosters. For moving the elevators upwards with great speed, shoot the detonator.
The elevator will move slowly this time, as you will be using it for going up (this can also be used as fast travel for moving to Reliance). Inside the chest of Chadd’s loot, you will discover Extreme Hanhin’ Chadd rare pistol. His loot will be next to the vending machine. You will also get credits and XP.
Rumble in the Jungle
You can begin this mission by getting to the exclamation mark in the region of the Voracious Canopy. Listen to the recordings while you are exploring the body.
On the map, here will be a Science Outpost marked, go there. It depends on you if you want to ignore the monsters or kill them when you come across them on your way. On the map, you can find three various locations where the Jabber monster needs to be killed. This is going to be the new mission objective. You can kill these monsters using any weapon. Be careful, some Jabber might also hide in the tree, so don’t forget looking at them too.
You also have to find three Scientist Journals other than eliminating the Jabbers. THere are two, which are a little difficult to get to:
- To get inside the closed hut for getting the journal, peek through the shutters and start shooting the shield, this leads to the opening of the main door.
- For the journal that is in the fridge, climb up for getting to the building’s upper entrance.
Meet Failurebot. For freeing the robot, tear the lock-down using a melee attack. Go after the Failurebot. You will get the task of finding the scientist. You will be taken to the Bloody Scientist Journal with the help of the markers. Go to the Kingdom of Bobo the Great. You have to complete 3 trials:
- Trial of Agility – Get to the village’s highest point and look for places from where you can climb (they will always be marked with yellow paint). Depending upon you, you can focus on your task at hand or kill the monsters.
- Trial of Strength – You must kill King’s Champion, the mini-boss. From the place where the last trial was completed, start firing at them from there. Be careful when you jump, because you can die by falling into the abyss or the lava.
- Trial of Wisdom – Jump into the lava by getting to the particular platform. The trial will be complete once you are reborn after dying.
You can now communicate with King Bobo the Almighty for receiving a new Scientific Journal.
Searching the secret lab is the new objective. Once you reach the location, you will see that the audio log is inside a cage and is suspended high in the air. Get to the desired place and climb. Fire at the hanging lock when you get to the highest cage. Pick the Scientific Journal up by jumping and climbing towards it.
You have to converse with Scaleon Hivemind two times by going to the bunker. Win the fight against Uplifted Ravagers and Uplifted Pollygrogs. The most optimal way of getting rid of Pollygrogs is to start killing them one at a time, keep in mind they have shields. Move towards the next room.
Get back to the Science Outpost and check your ammunition and health. Face the mini-bosses, iOsaur, Queen of the Scaleon and King Bobo the Almighty by entering The Terradome.
A vital piece of information about the battle is that it is not necessary for you to stay inside The Terradome. You can leave whenever you want as the entry to the location will always be open. You can not only take a break from the fight with the bosses but can also attack them from afar. Keep in mind that it is possible but very rare that Bobo and iOsaur can also get out of the dome.
Another point to keep in mind is that King Bobo and Queen iOsaur are not only having a fight you, but they are also fighting among themselves. Depending upon your choice, you have the option of leaving the dome and waiting for them to weaken each other. Get back to the arena, when they are weak.
Don’t forget, you have to kill the bosses one at a time. There is no specific order that needs to be followed, kill them in whatever order you feel like. Queen iOsaur looks like a T-Rex and can spit acid and shoot bullets. You can avoid both by moving towards the sides. She only has one health bar. A red one.
Bobo the King likes jumping on the higher shelves in the dome and hit from up there by throwing acid balls. Run to the sides because he also has the ability to create a shockwave if it hits the ground. This boss has a red and a yellow bar.
There are many chances that one of the bosses is going to knock you down but you can shoot Squire Jabbers if you keep running around the arena. Get the Second Wind by killing them with one of the strongest weapons you have and then continue with the fight.
The bosses will drop a random gear, eridium, and credits. For completing the mission, you have to have a conversation with Failurebot. This will result in you getting a ton of credits and XP.
Sell Out
To begin the mission you have to go to the exclamation mark in the region of Ambermire (notice board).
Hear to the offer by Tyreen and Troy – you can also commit suicide if you want to earn a handsome reward. When you reach the destination, you can act in the following ways:
- Press the button when you get inside the trap. You will die (try to spend the extra credits in advance). After reviving, you will receive a new weapon – Hazardous Sellout legendary pistol (can deal with Corrosive damage or Incendiary).
- There are five cameras in the surrounding. Destroy them with the help of the trap. You will not die but you will also not receive the weapon.
Whatever option you will choose, credits and XP is what you will receive.
Riders of the Lost Rock
Examine the board in Reliance by getting to the exclamation mark in the Floormoor Basin region.
Talk to Professor Miles Brown who is the giver of the quests and is standing nearby. You have to get back to Ambermire. This is time for a long trip. The places are marked on the game where you can discover 139.377 Brownrock, pick each of them. Then the game will automatically mark the next location of where the next rock is. You don’t have to have a battle with the enemies if you don’t think of them as a threat.
You will be led to a passage. Enter the Curltail Warren once you have killed Jabbers. There, you will come across 4 more rocks.
King Gnasher, a mini-boss will show up. Attack him using a weapon of your choice, it is better if you fight with him from afar. This boss is going to drop the final item for the quest – 139.777 “Abigail” Brownrock. Return to the professor in Reliance. You will get credits, XP and a rare Grenade Mod.
That is all for our Borderlands 3 Eden-6 Side Quests guide. If you are interested in learning more then you can check out our Promethea side quests guide as well.