

Borderlands 3 has plenty of side quests that you can check out. In this Borderlands 3 guide, we are going to go over all the side quests that you can check out when you return back to Pandora.
All Pandora Return Side Quests In Borderlands 3
The following are all the Borderlands 3 side quests that you can check out when you get back to Pandora.
Buff Film Buff
Converse with Buff for starting this mission by getting to the exclamation mark in Devil’s Razor.
You have to get to – The Sin-A-Plex, the specified dumpster. Search all of them, only one will have the recording of ECHO Drive. Get where there is a projector. On your way, you will have to get rid of many regular opponents and then put the recording inside the projector.
Get rid of Rohner. He is the thug that makes use of the rocket launcher. So be very vigilant and keep running during the fight towards the sides. By using the knob, get inside the hut and from there get the projector bulb. Get back to the hall that has the projector. Be careful of the Badass thug that might appear there. Turn the projector on after replacing the bulb. For completing the quest, you have to get back to Buff. you will get credits and XP as rewards as a result of completing the mission.
Boom Boom Boomtown
For starting the mission, Talk to Tina or Brick by getting to the exclamation point in the Devil’s Razor.
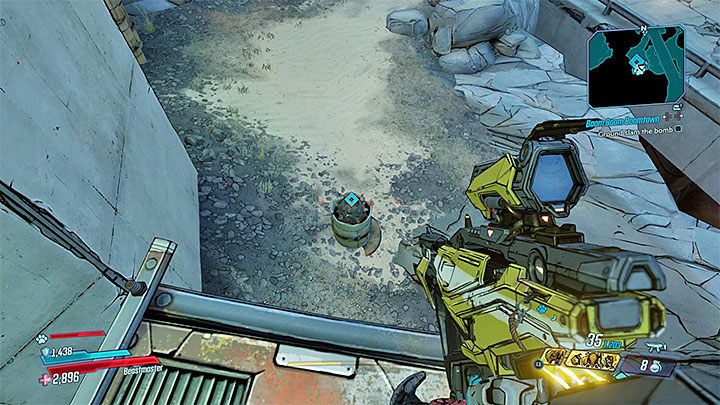
This mission is assigned by two people, but it is not going to affect how it turns out. Performing a Ground Slam attack on a bomb is going to be your first task. This bomb resembles a mine that is stuffed inside a damaged pipe. Right above the bomb is the balcony, climb up the stairs and sit there. While jumping, crouch by pressing the button for starting the Slam attack and hitting the ground (bomb in this case) with a great force.
Jump and during the flight press the crouch button to start the Slam attack and hit the ground (in this case the bomb) with great force. Go to Brick and as soon as the gates are opened by him, start shooting at the bomb.
In the Cave-in-Point, you will have to deal with the COV fanatics. You can count on the allies while you are in the battles. Most of the Anointed Psychos can not only mount elemental attacks but can also teleport. So you have to watch out for them. Gather the loot after you have won the battle by breaking the purple nugget.
For completing the quest, after you have won the battle, you have to converse with Tina. Boomtown can be unlocked. In this safe place, the vending machines can be used, you can quick travel and you are also able to get new side quests. You will receive a weapon Trinket, XP and credits for completing this mission.
Sheega’s All That
In order to start Sheega’s All That, you have to go to the exclamation point in the region of Devil’s Razor after you have completed the Boom Boom Boomtown mission. Converse with Tina.
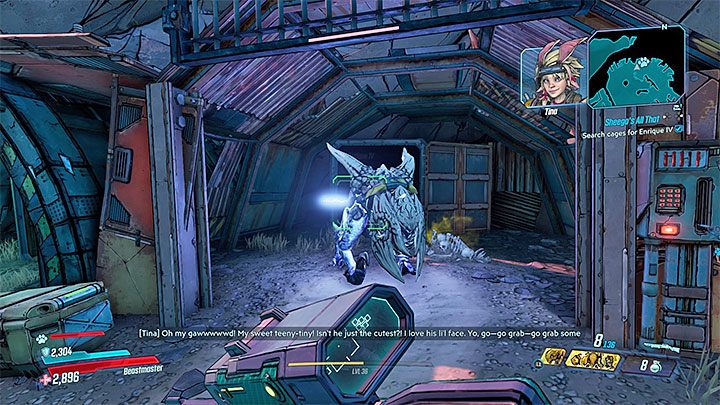
Tina will give you some decorations. The five marked places in Sheega’s Kennels require the decorations to be hanged in. The doorbell is to be used. Kill the scags which will appear close to the building. Use a Melee attack on a decoration, once you have fought with and killed the monsters.
You have to let the door unlock, so stand back. All cells should be examined in the area that is specified on your map. You will come across a domicile skag – Enrique IV in one of them.
Feed Enrique using the knob that is marked. Sheega – a mini-boss – will appear and it is recommended if you keep on moving while attacking from afar. There are also going to be some other Badass skags, however, getting rid of them is your choice. When Sheega will die, only then will the objective of the quest be refreshed. After you have won the fight, go back to the gate switch.
Enrique’s freedom will be his again. You should get back to Boomtown to Tina after getting the rewards, XP and credits, for finishing the quest.
Life of the Party
For starting the quest, you have to go to the exclamation point in the region of Devil’s Razor after you have completed the Boom Boom Boomtown mission. Converse with Mordecai.
Start with collecting the Special Flowers by getting to the Phalanx Pass. While you are collecting the five flowers, the skags are going to disturb you. Move now to the Lonely Pillar where wake is happening. Thanks to the balloons, you will be able to recognize the island which is led by a drawbridge. Put the flowers on the grave after talking to Mordecai. After that, communicate with Hirschim and get to the party venue.
There are 3 additional goals with this quest. Working on these additional goals is not going to affect the reward you are going to get after you have completed the task. Completing the additional tasks are going to make Hirschim upset and while Mordecai is going to be mad, but it will not have any negative impact on you. In the first optional goal, you have to find all the 12 cake pieces instead of only 2. Finding these cake slices should not be hard. One is going to be in the house.
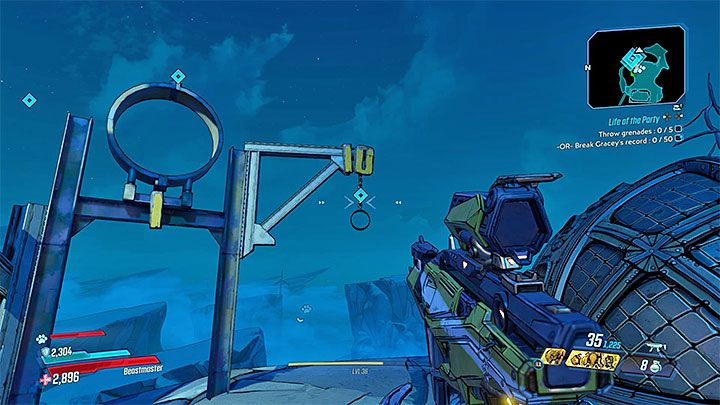
Throwing grenades through the hoops and breaking the 50 points record is going to be the second side objective. Restocking the grenades is going to be an easy task as they can be found nearby. Aiming for the smallest ring for 10 points is going to be the best option. Adjust the camera in a way that the grenades fly into the rings. If your aim is to only complete the main objective of this mission, you can throw any 5 grenades and that should be enough.
Braking the record and killing 30 Rakks during the given time frame is going to be the third optional goal. Use an assault rifle and an SMG alternatively is ideal for this. You can use weapons that do not need to be reloaded such as COV weapons. If you do not want to make Hirschim upset, then either only break the record of Mordecai or do not break the record at all.
In the end, converse with Hirshi and make use of a weapon of your choice for destroying the pinata. You will Dastardly Amazing Grace, the legendary gun, credits and XP as rewards for completing the quest. You will be rewarded with the gun no matter if you do or do not complete the optional mission.
Dynasty Dash: Pandora
For starting the mission, you have to go to the exclamation point in the Devil’s Razor. You will see a board for Roland’s Rest.
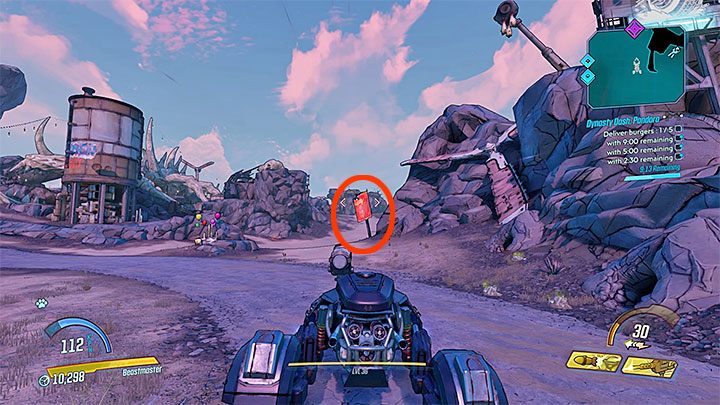
This quest is similar to that of the Dynasty Dash: Eden-6. For a better understanding, check the walkthrough of this quest in the chapter of Eden-6. Here are a few things to remember:
- Start with gathering the burgers. That starts a counter (it is always a good idea to have a standby car).
- The time limit for this task is 10 minutes. For getting much better rewards, finish it earlier and try completing other additional goals.
- Follow whatever order you want in order for you to get to the goals. The route should be planned for this trip on the region’s map, especially because it is temporarily stopping the meter.
- For travelling at a top speed, a good nitro car should be used (e.g., Outrunner with Razor Wings accelerator).
- In order to increase the amount of time for completing the task, you can demolish the red signs of the competitors along the way.
- When you get to all of these 5 locations, your soul focus should be on leaving the burgers in the specified green area by ignoring all the enemies.
If you complete the mission in the given time duration, you will get the employee of Dynasty Diner’s reward at Roland’s Rest. You can also repeat this quest – in Roland’s Rest a quest marker is going to appear which will allow you to complete the Dynasty Dash: Devil’s Razor. The objectives of the mission will remain the same, you will have to deliver the burgers to the exact same spot every time this mission is played.
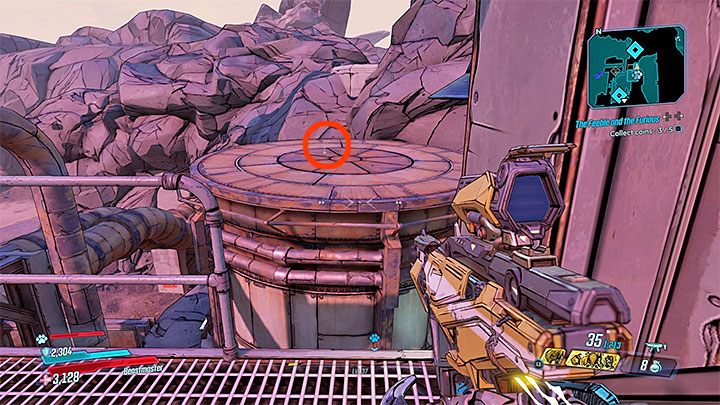
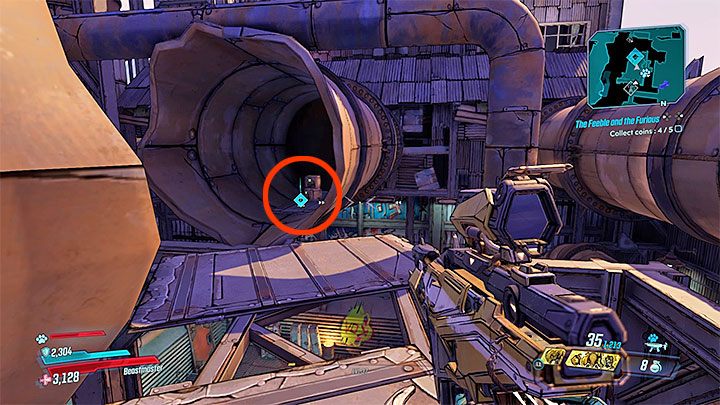
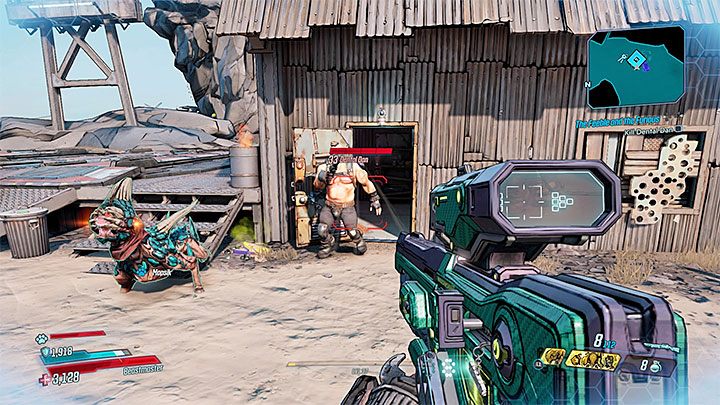
The Feeble and the Furious
For starting the mission, you have to get to the exclamation point in the Devil’s Razor and check the board at Roland’s Rest.
Converse with Lizzie by getting to Mesa Marron. Pappy’s Jalopy car will be parked in the garage, get inside it. Take Pappy to the marked location by playing as his chauffeur. In all of your visits, you have to park the car inside the rectangle and have to listen to the instructions given by Pappy.
In your first location, you have to run over all the enemies that have “Milky” in their names and then exit the car for picking up the Intact Milkpod items that will be dropped by these monsters. You need to get five of them.
Dahl Refinery is the other location. Park your car and look for the dead coin dealer by going into the channels. Start killing the opponents as soon as you enter the refinery
Collect 5 Worthless Rare Coins. You can only do so by searching the complete refinery. Some coins will be available on the roofs and higher shelves, while all the coins will be marked on the map. For getting to the coins that are located higher up, you will have to jump on the pipes and the shelves for climbing. You can find the first coin on a large round pond’s roof. From the surrounding balconies, you can jump into the tank.
You can find the other coin in the damaged pipe. Start climbing its location by jumping into the metal shelves and smaller pipes and then head back to the car of Pappy with the coins you have collected.
Dentist’s hut is going to be the third location that you will visit. Knock the door after you have parked your car inside the rectangle upon getting to the place. Eliminate Dental Dan when he exits the cabin and take his teeth – Dental Dan’s Teeth.
Go back to Pappy’s house – the place from where this trip was started – by getting in the car. Converse with Lizzie by putting the car in the garage. You will receive credits and XP for completing this mission.
The Homestead
For starting the quest, you have to go to the exclamation point in the region of The Splinterlands. It is a Bulletin Board at Pitt’s Stop.
At The Homestead, you have to converse with Ma Honeywell. She requests you to buy two items. One is the Fuse. It is located in one of the neighbouring locations, in which you can enter using a small tunnel. The bandits will be guarding the Fuse.
The second is a Wind Turbine Core, which is in an area where you might come across a mini-boss DJ Deadsk4g. It is optional to kill him, but try and not skip it. Whatever your decision is, go to the big turbine for removing the core from it. Get back to Ma Honeywell with the items you have collected. He is going to ask you to install them on two separate devices that are on the farm. In the end, go back for collecting credits and XP as the rewards. Immediately, from here you can continue with the next mission.
The Homestead (Part 2)
To start this mission, you have to converse with Ma Honeywell after you have finished The Homestead mission.
Get to the source. You will go through a small passage on your way by pressing the button at the gate. Skags will attack you. You will have to kill a little stronger beast, Vermilingua when you get to the indicated place. It is best if you damage it from afar and while you are attacking it, keep on moving so that it doesn’t get to you. After you have won, get to Pa Honeywell who is wounded while holding the button for resurrecting him.
For getting the Explosives, you have to explore three piles. Use the detonator after you have placed them in the big pile. Return to Ma Honeywell after the big bang. You will again get credits and XP for completing the mission.
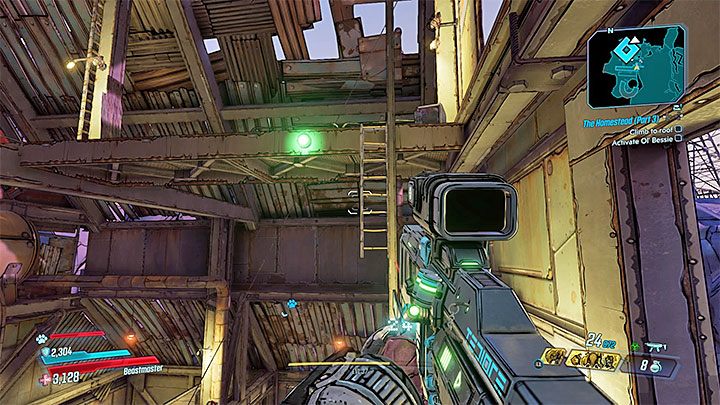
The Homestead (Part 3)
Talk to Pa Honeywell for starting this mission. You can only talk to him after finishing the previous part of the mission.
Get to the barn by following Pa Honeywell. Make an attempt (which should be unsuccessful) of launching Ol’ Bessie by using the lever. You have to move towards the next valves. Using the ladder is the only requirement of the first valve. You have to climb up to the second valve which can be found on the other side of the barn.
The problematic one is the third valve. Go to a small staircase and walk across the thin metallic part of the barn.
The fourth and the last valve is a bit higher and harder to get to. Jump outside the balcony, take a right and then climb up the hole. Aim the weapon and start shooting at the visible shield in the distance once you are at the top.
A ladder drop. Jump on it and traverse to the top. Another staircase will let you get to the roof. Run towards the defence turret – Ol’ Bessie – on the roof by pulling the lever.
Visit the specified area by jumping down. New thugs will start arriving using the dropships. After you have destroyed all the opponents, go back to Pa Honeywell for completing the quest. As a reward for completing the mission, you will get a rare AR called Pa’s Rifle, credits and XP.
Just Desserts
For starting the quest you have to talk to Beatrice by getting to the exclamation point in The Splinterlands.
A task of buying multiple items will be received by you. In an enemy camp, there is a Barrel of Gunpowder. Kill all the thugs and look for a ladder longer in size because it is going to be the one that is going to take you to the high metal balcony. That is where you will find the gunpowder.
After you enter into the lair of monsters, you need to get your hands on the Spiderant Eggs. Once you have arrived, you have to get rid of the spiderants. While you are killing them, be careful about their queen named Queen Ant Wanette – which is very strong. Only after you have cleared the lair, find large cocoons. Every cocoon is going to leave 4 eggs behind. Get back to Beatrice after you have all the required ingredients with you.
Collecting the box of “Candles” is how the second portion of the quest starts. Get the three Cake pieces by having a conversation with Beatrice. Enter in the mine using the indicated entrance. Place the layers of the pie by interacting with the small cart and put the dynamite sticks (candles) on the cake.
Light the candles or dynamites, ring the bell and then use the melee attack for pushing the cart inside the mine. Take some steps back and wait for the dynamites to explode. Loot the corpses of the thugs who are going to run outside the mine before it dies is going to be worth it. He is going to drop cosmetics items. Go back to Beatrice for completing the mission. You will gain credits, XP and a rare Grenade Mod called Chocolate Thunder.
Let’s Get It Vaughn
For starting the quest, you have to go to the exclamation point in the region of Carnivora. Converse with Zahnzi Kall.
You have to keep following Zahnzi to where there is going to be a quiz. Listen to all the rules by standing on the podium. After you have listened to every question, you need to answer by clicking on the buttons A, B or ignoring altogether. This is not going to affect your quest completion.
In a couple of rounds, the quiz will end however, Vaugh can intervene if need be. You have to now collect the loot which will appear by the stage. While collecting the loot, you also have to deal with your competitor, which is going to turn on you. After you have won this fight, you have to converse with Zahnzi one more time. As a reward for completing this quest, you will get credits, XP Itsy Bitsy Rakky Hive, a rare weapon trinket.
Wildlife Conservation
Have a look at the corpse once you have got to the exclamation point in Konrad’s Hold region.
You have to look for Talon and go after his trail of blood. Focusing on them is not necessary as the objectives will automatically be updated in the minimap. Start getting rid of the monsters by entering into the Unused Escaped Tunnel. Once you have got to the closed airlock, you need to look for the search explosives. These can be hidden anywhere. For example, behind the barrels, etc.
After you have collected the items of the quest, place the explosive on the car and attack the tank of the car that is attached to it using a melee attack.
Through the mine, your journey can be continued. Kill the Varkids once you reach the exit point of the mine. Complete your journey after listening to the conversation with Brick and after the mission’s objectives are updated go to Devil’s Razor.
Meet with Brick and Mordecai by returning to the Boomtown camp. After some time, the mission will come to an end. For completing this mission, you will get credits, XP and a rare sniper rifle.
The Demon in the Dark
For starting the mission, go to the exclamation point in Konard’s Hold region and have a look at the head of the bot on the floor.

Pull the larger lever that you will find close to the pond. Grab Wren’s Head and then start entering the These Are No Mines dungeon. Somewhere around there, you will discover the remaining bot, upon which the head needs to be placed.
Wren is the one who is going to unbar more crossings, so you have to start following him. You will come across multiple kinds of enemies inside the dungeon, but getting rid of them should not be difficult. You need to look for an object that continuously makes noises, it can be found in one of the caverns and on the construction’s roof. Climb up there. For revealing the Lark, you have to do a melee attack on numerous varkids. Turn the alarm off.
Three puzzles need to be solved for activating the three runes. Every single time your objective is going to be shooting through the three hoops and hitting the rune using a weapon of your choice. You have to position yourself in a way that the bullets go through the aligned hoops. Wait until the hoops turn purple in color, that is a signal for a successful shot.
Once all the eridian runes are activated, move forward with your journey. The last room should be unlocked by Wren in the dungeon, which is your destination. It is vital that Lagromar is defeated here. He is not a very strong enemy but keep a lookout for his elemental attacks by which he is going to bomb the area.
Maximum loot will be left behind by the defeated monster and in it you will discover Alkonost’s Head. Wait till the exit is unlocked from the dungeon. You will also find chests in there with valuable loot. Go back to Wren for retrieving the quest items that you have found in the dungeon. Eridium, XP and Burning Chomper rifle will be the rewards you will get for completing the quest.
Childhood’s End
For starting the mission you have to go to the exclamation point in the Konrad’s Hold region. Check the switch by the locked gate at Angel’s Light hideout.
Find the picture on the wall once you have opened the pantry. Move the portrait after hearing the message from Tannis. You then have to look for the teddy bear which is going to lie on the couch. Tap it and start listening to the recording.
Finding a vending machine that is inactive and finding the lever that leads to the pantry in the corner is going to be the next step. Touching the vending machine will result in random weapons dropping out and one more recording will start. Power fuse also needs to be taken.
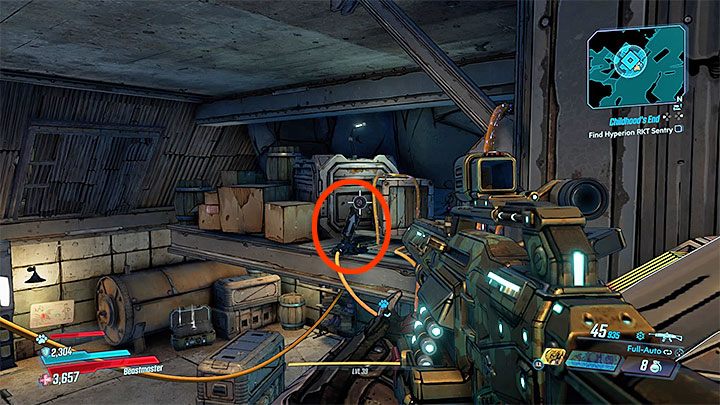
Finding the Hyperion RKT Sentry gun is going to be the next step. Enter into the cave after you have placed the fuse inside the box. Get to the upper story that has already been explored. Pressing the button on the machine for getting to it. You will find a small shield when you will turn around, shoot with a weapon of your choice. You will find another shield at the top, shoot that as well. A pantry (small in size) with a shield can be entered. Start listening to the recording by pressing it.
Finally, you have to get rid of the Hyperion SKT Sentry gun that turned on. It is better if you stay on the side while throwing grenades into the pantry or if you want to shoot, stand on the border of the gun’s range. After you have gotten rid of it, get to the pantry and check the ladder. Look up to destroy the boards so a hole in the ceiling can be opened. Only after that, you should climb up the ladder that takes you to the top.
For playing the new recording, you have to touch the satellite that has been discovered. Ultimately, you have to go to Roland’s Rest in the region of The Devil’s Razor. Look for the water purifier and touch it in the camp. After you have completed the quest you will get a rare Loop of 4N631 shield with a Phaseshift feature, credits and XP as rewards.
That is all for our Borderlands 3 Pandora side quests guide. If you are interested in learning more about the game then you can check out our side quests guide for Athenas.