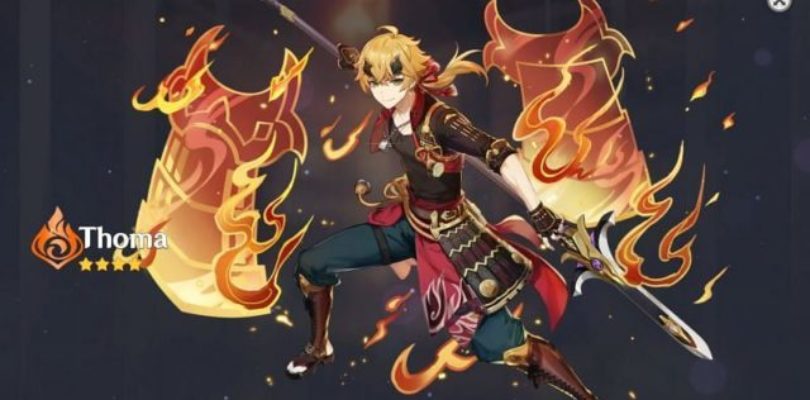
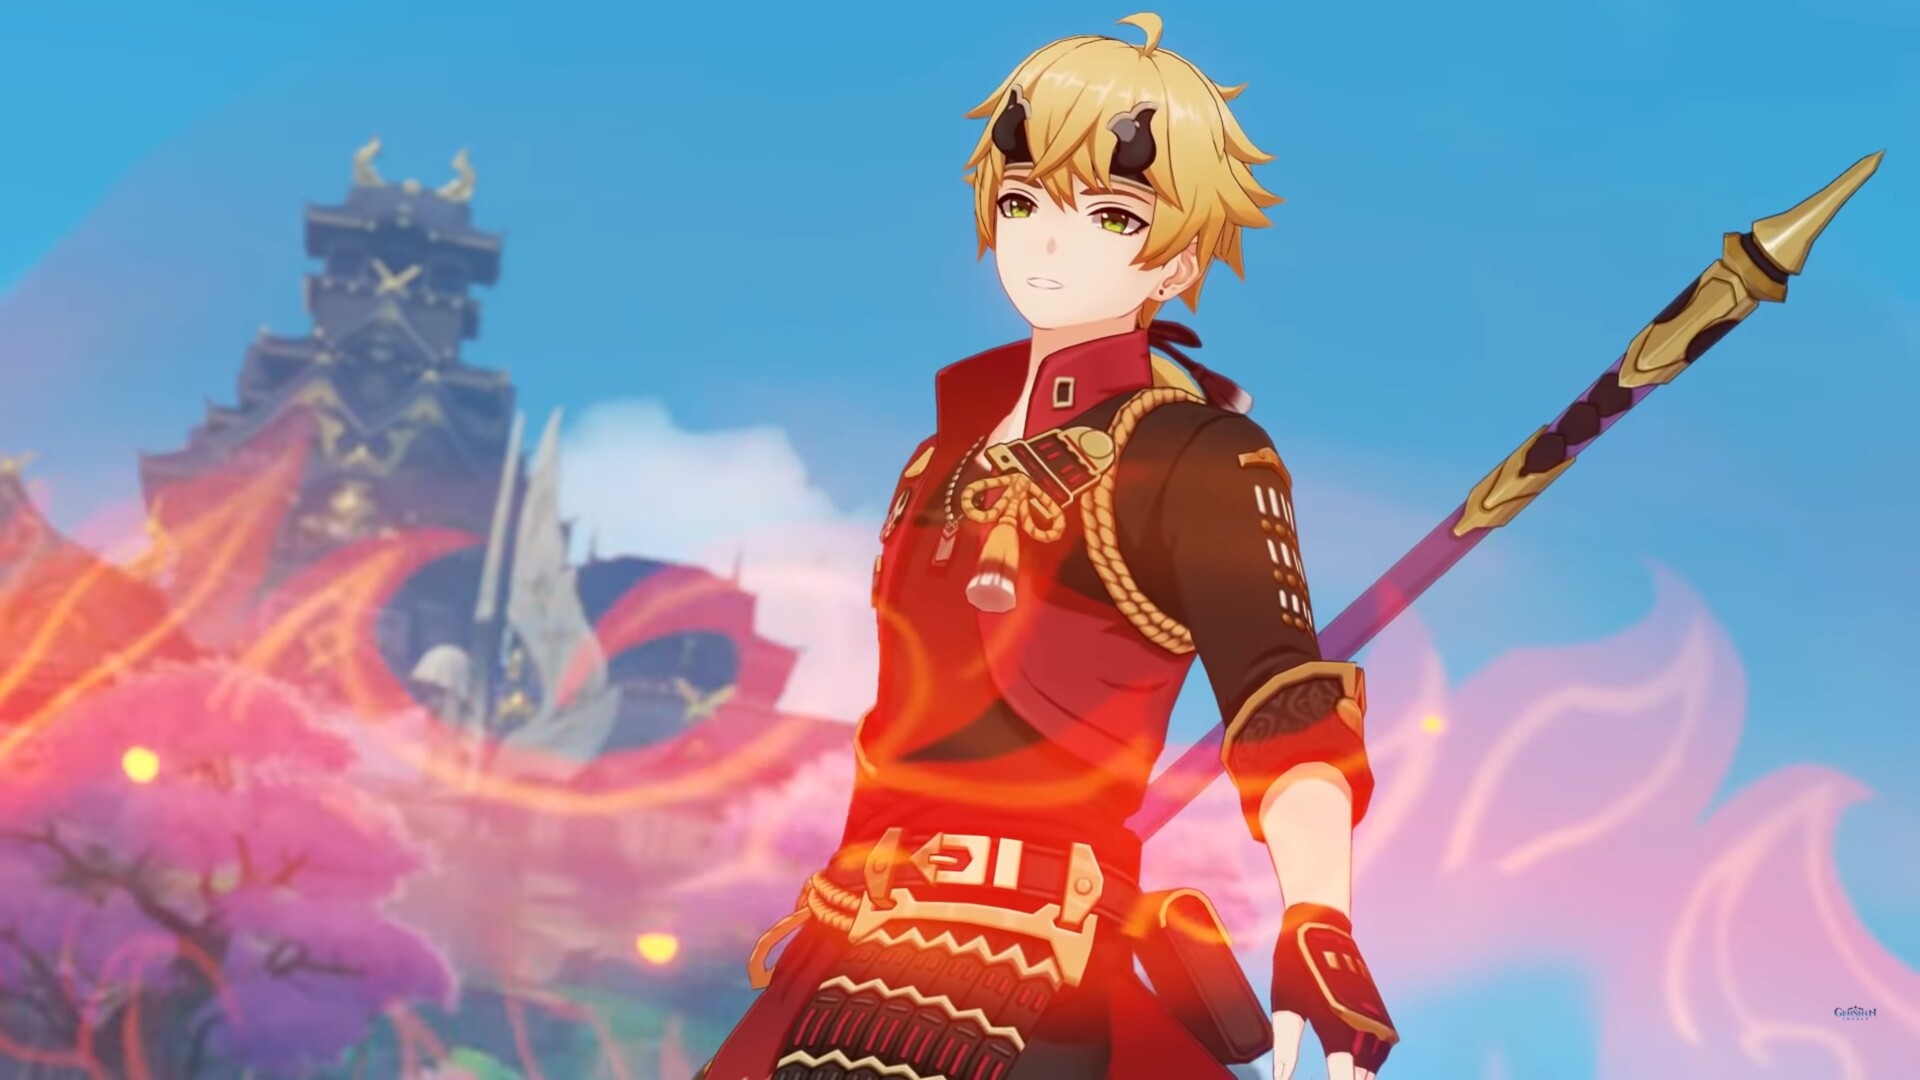
Welcome to our comprehensive guide on Thoma, the Pyro character from Inazuma in Genshin Impact! Although Thoma is not the newest character in the game, he is still one of the most exciting additions to the roster, offering a unique blend of speed, support, and damage abilities.
Whether you’re a seasoned Genshin Impact player or a newcomer, our guide is designed to provide you with valuable insights and tips that will help you unleash Thoma’s full potential.
We will delve into Thoma’s backstory, explore his talents and abilities, and provide you with detailed information on how to level him up and progress through his ascension phases. Our guide also includes recommendations for the best weapons and artifacts to equip Thoma with, ensuring that he is equipped to face any challenge that comes his way.
So, whether you’re looking to build Thoma as your main damage dealer or as a powerful support character, our Thoma guide will provide you with everything you need to know to succeed. Let’s dive in and discover what makes Thoma a valuable addition to your Genshin Impact roster!
Who Is Thoma In Genshin Impact?
Thoma is a pyro-type character in Genshin Impact who is expected to be released in a future update. He comes from the land of Watatsumi, which is located in the Inazuma region of Teyvat.
Thoma serves as the captain of the Watatsumi Island Defense Force and is highly respected by his fellow soldiers. He has a strict demeanor and is devoted to protecting his people from any threat that may come their way.
via Pocket Tactics
In addition to his combat skills, Thoma also has a talent for cooking and is known for preparing delicious seafood dishes that are popular among the people of Watatsumi Island.
Despite his serious nature, Thoma has a soft spot for children and often spends his free time playing with them. He is also known to have a deep sense of justice and is willing to do whatever it takes to ensure the safety and well-being of those around him.
Builds for Thoma in Genshin Impact
Thoma, being a versatile character in Genshin Impact, has the potential to play various roles within your team. As a pyro-based character, he can contribute to elemental reactions and provide support, but also function effectively as a sub-DPS or shield generator.
His main mechanic revolves around his elemental skill and burst, which helps in generating shields and dealing consistent pyro damage to enemies.
While we won’t provide any specific builds for Thoma, we encourage you to experiment with different artifact sets, weapons, and team compositions to find the perfect combination that suits your playstyle and enhances Thoma’s overall performance.
Best Weapons for Thoma
To make the most of Thoma’s capabilities, you should focus on weapons that enhance his pyro abilities, shield generation, and overall performance.
Here are some of the top weapons to consider for Thoma:
Favonius Lance
via Reddit
The Favonius Lance, a 4-star weapon from the Favonius Series, is a polearm that was introduced on September 28, 2020. It can be acquired through Wishes.
This weapon features the Windfall ability, which grants a 60% chance for CRIT Hits to produce a small quantity of Elemental Particles, restoring 6 Energy for the wielder. This effect has a 12-second cooldown.
- Base ATK (Lv. 1 – 90): 44 – 565
- 2nd Stat Type: Energy Recharge
- 2nd Stat (Lv. 1 – 90): 6.7% – 30.6%
Ascension Materials Table:
| Material | Quantity |
|---|---|
| Mora | 150,000 |
| Fetters of the Dandelion Gladiator | 3 |
| Chains of the Dandelion Gladiator | 9 |
| Shackles of the Dandelion Gladiator | 9 |
| Dream of the Dandelion Gladiator | 4 |
| Chaos Device | 15 |
| Chaos Circuit | 18 |
| Chaos Core | 27 |
| Slime Condensate | 10 |
| Slime Secretions | 15 |
| Slime Concentrate | 18 |
Please be aware that the Favonius Lance’s passive effect will not activate for hits that inflict no DMG, even if they register as CRIT Hits. The passive may activate for each hit that damages an enemy or for each enemy hit while the character is active on the field.
If a character deals critical damage while not on the field, the passive will not activate. When playing in Co-Op Mode, activating the passive will generate elemental particles for the entire team.
Engulfing Lightning

via Reddit
The Engulfing Lightning is a 5-star polearm from the Inazuma Series. It was released on September 1, 2021, and can be obtained through Weapon Event Wishes.
This polearm features the Timeless Dream: Eternal Stove ability, which increases ATK by 28% of Energy Recharge over the base 100%, up to a maximum bonus of 80% ATK. Additionally, it grants 30% Energy Recharge for 12 seconds after using an Elemental Burst.
- Base ATK (Lv. 1 – 90): 46 – 608
- 2nd Stat Type: Energy Recharge
- 2nd Stat (Lv. 1 – 90): 12% – 55.1%
Ascension Materials Table:
| Material | Quantity |
|---|---|
| Mora | 225,000 |
| Mask of the Wicked Lieutenant | 5 |
| Mask of the Tiger’s Bite | 14 |
| Mask of the One-Horned | 14 |
| Mask of the Kijin | 6 |
| Chaos Gear | 23 |
| Chaos Axis | 27 |
| Chaos Oculus | 41 |
| Old Handguard | 15 |
| Kageuchi Handguard | 23 |
| Famed Handguard | 27 |
Please note that at R1, approximately 286% additional Energy Recharge (386% in total) is needed to maximize the weapon’s ATK increase bonus. At R5, the same threshold is approximately 214% additional ER (314% in total).
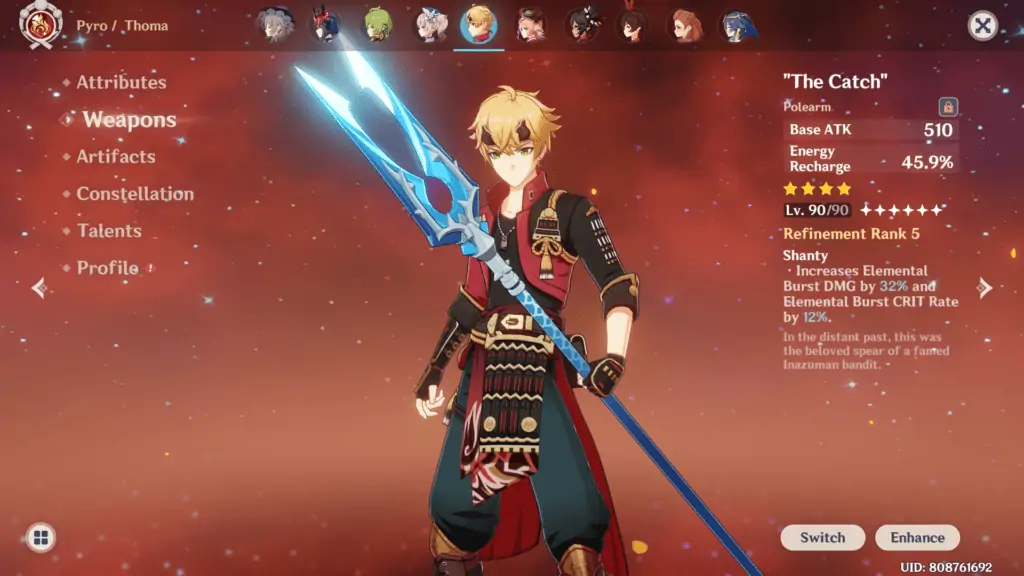
The Catch

The Catch is a 4-star polearm from the Fishing Association Series. It was released on September 1, 2021, and can be obtained from Kujirai Momiji in exchange for specific fish.
The weapon features the Shanty ability, which increases Elemental Burst DMG by 16% and Elemental Burst CRIT Rate by 6%.
- Base ATK (Lv. 1 – 90): 42 – 510
- 2nd Stat Type: Energy Recharge
- 2nd Stat (Lv. 1 – 90): 10.0% – 45.9%
Ascension Materials Table:
| Material | Quantity |
|---|---|
| Mora | 150,000 |
| Mask of the Wicked Lieutenant | 3 |
| Mask of the Tiger’s Bite | 9 |
| Mask of the One-Horned | 9 |
| Mask of the Kijin | 4 |
| Chaos Gear | 15 |
| Chaos Axis | 18 |
| Chaos Oculus | 27 |
| Spectral Husk | 10 |
| Spectral Heart | 15 |
| Spectral Nucleus | 18 |
Obtaining Method
To obtain The Catch, you will need to trade the following fish with Kujirai Momiji:
- Raimei Angelfish: 6
- Golden Koi: 20
- Rusty Koi: 20
To refine The Catch, you will need Ako’s Sake Vessel, which can also be purchased from Kujirai Momiji with the following fish:
- Raimei Angelfish: 3
- Pufferfish: 10
- Bitter Pufferfish: 10
Please note that The Catch can only be claimed once and cannot be used to enhance another weapon.
Kitain Cross Spear

via HoYoLAB
The Kitain Cross Spear is a 4-star Inazuma polearm belonging to the Amethyst Series. Introduced on July 21, 2021, this weapon can be crafted through forging. It features the Samurai Conduct ability, which enhances Elemental Skill DMG by 6%.
When an Elemental Skill connects with an opponent, the character expends 3 Energy but regains 3 Energy every 2 seconds for 6 seconds. This effect has a 10-second cooldown and can activate even if the character is not on the field.
Base ATK (Lv. 1 – 90): 44 – 565 2nd Stat Type: Elemental Mastery 2nd Stat (Lv. 1 – 90): 24 – 110
Materials Needed for Ascension:
| Material | Quantity |
|---|---|
| Mora | 150,000 |
| Mask of the Wicked Lieutenant | 3 |
| Mask of the Tiger’s Bite | 9 |
| Mask of the One-Horned | 9 |
| Mask of the Kijin | 4 |
| Chaos Gear | 15 |
| Chaos Axis | 18 |
| Chaos Oculus | 27 |
| Treasure Hoarder Insignia | 10 |
| Silver Raven Insignia | 15 |
| Golden Raven Insignia | 18 |
Forging Recipe:
| Material | Quantity |
|---|---|
| Northlander Polearm Billet | 1 |
| Amethyst Lump | 50 |
| White Iron Chunk | 50 |
| Mora | 500 |
Keep in mind that the Samurai Conduct passive effect can be triggered even when the character has less than three energy.
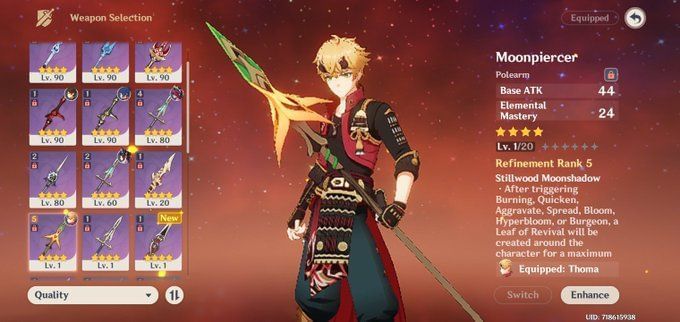
Moonpiercer
via Sportskeeda
The Moonpiercer is a 4-star polearm from the Aranara Series. It is a forgeable weapon that resembles a giant arrow and can be used as a spear.
The weapon has the Stillwood Moonshadow ability, which creates a Leaf of Revival around the character for up to 10 seconds after triggering specific elemental reactions.
Picking up the Leaf grants the character a 16% ATK boost for 12 seconds, and only one Leaf can be generated every 20 seconds. This effect can still be triggered if the character is not on the field.
- Base ATK (Lv. 1 – 90): 44 – 565
- 2nd Stat Type: Elemental Mastery
- 2nd Stat (Lv. 1 – 90): 24 – 110
Ascension Materials:
| Material | Quantity |
|---|---|
| Mora | 150,000 |
| Oasis Garden’s Reminiscence | 3 |
| Oasis Garden’s Kindness | 9 |
| Oasis Garden’s Mourning | 9 |
| Oasis Garden’s Truth | 4 |
| Chaos Storage | 15 |
| Chaos Module | 18 |
| Chaos Bolt | 27 |
| Recruit’s Insignia | 10 |
| Sergeant’s Insignia | 15 |
| Lieutenant’s Insignia | 18 |
Recipe for Forging Moonpiercer:
- Midlander Polearm Billet: 1
- Crystal Chunk: 50
- White Iron Chunk: 50
- Mora: 500
Forging Time: 10 seconds
Best Artifacts on Thoma
Since Thoma’s kit relies on being the shield maniac in order to find sufficient success. You would need to ensure the Artifacts target the correct stats.
With that said, here are all viable options you can go on Thoma:
Flower of Paradise Lost
The Flower of Paradise Lost artifact set is specifically crafted to augment elemental mastery and reaction damage, and can be found in both 4-star and 5-star rarities.

via VCgamers
The set bonuses come into play at the 2-Piece and 4-Piece levels, offering a blend of Elemental Mastery enhancement and exclusive Bloom, Hyperbloom, and Burgeon reaction damage boosts.
This set comprises the following individual artifacts:
- Flower of Life: Ay-Khanoum’s Myriad – A vivid flower artifact symbolizing the infinite blessings bestowed by the ancient city.
- Plume of Death: Wilting Feast – A plume artifact illustrating the juxtaposition between vitality and decay.
- Sands of Eon: A Moment Congealed – A timepiece artifact capturing a significant instant frozen in time.
- Goblet of Eonothem: Secret-Keeper’s Magic Bottle – An enigmatic goblet artifact believed to hold the universe’s mysteries.
- Circlet of Logos: Amethyst Crown – A royal circlet artifact embellished with a mesmerizing amethyst gemstone.
Upon collecting and equipping the majority of these artifacts, your character will enjoy the following set bonuses:
2-Piece Bonus
This bonus provides an 80-point increase in Elemental Mastery, substantially boosting your character’s elemental reactions and damage.
4-Piece Bonus
The character wearing this set experiences a 40% increase in Bloom, Hyperbloom, and Burgeon reaction DMG. Moreover, once the character initiates a Bloom, Hyperbloom, or Burgeon reaction, they receive an additional 25% bonus to the aforementioned effect.
Each stack lasts for 10 seconds, with a maximum of 4 stacks at once. This effect can be activated once every second. The character can still trigger these effects while off the field.
How to Obtain
Both the 4-star and 5-star versions of the Flower of Paradise Lost artifacts can be acquired from the following sources:
Source 1: City of Gold – An age-old, resplendent city teeming with concealed treasures and enigmas waiting to be discovered. Venture deep into the city to uncover the Flower of Paradise Lost artifacts.
To fully harness your character’s elemental prowess, persistently farm this location until you have collected the entire Flower of Paradise Lost set. Outfitting your character with this artifact set will substantially improve their elemental mastery and reaction damage, making them a formidable contender in any elemental confrontation.
Noblesse Oblige
The Noblesse Oblige artifact set is tailored to amplify Elemental Burst damage and provide an ATK boost to the entire party. It is available in both 4-star and 5-star rarities.

via Vcgamers
The set bonuses are activated at the 2-Piece and 4-Piece levels, delivering a combination of Elemental Burst damage increase and an ATK bonus for all party members.
The set consists of the following individual artifacts:
- Flower of Life: Royal Flora – A majestic flower artifact symbolizing the grandeur of royalty.
- Plume of Death: Royal Plume – A luxurious feather artifact representing the elegance of the royal class.
- Sands of Eon: Royal Pocket Watch – A refined timepiece artifact that denotes the importance of time in royal affairs.
- Goblet of Eonothem: Royal Silver Urn – An exquisite goblet artifact that embodies the splendor of royal possessions.
- Circlet of Logos: Royal Masque – An opulent circlet artifact representing the enigmatic aura of nobility.
When you collect and equip most of these artifacts, your character will benefit from the following set bonuses:
2-Piece Bonus
This bonus grants a 20% increase in Elemental Burst DMG, significantly boosting the damage output of Elemental Bursts.
4-Piece Bonus
Upon using an Elemental Burst, all party members’ ATK is increased by 20% for 12 seconds. This effect cannot stack.
How to Obtain
You can obtain both the 4-star and 5-star versions of the Noblesse Oblige artifacts from the following sources:
Source 1: Clear Pool and Mountain Cavern – A serene yet treacherous location where powerful adversaries reside. Delve into the depths of the cavern to acquire the Noblesse Oblige artifacts.
To maximize your character’s Elemental Burst potential and enhance your party’s ATK, continue farming this location until you obtain the complete Noblesse Oblige set.
Equipping your character with this artifact set will significantly improve their Elemental Burst damage and provide an invaluable ATK boost to your entire team.
Emblem of Severed Fate
The Emblem of Severed Fate artifact set is tailored to boost energy recharge and elemental burst damage, available in 4-star and 5-star rarities.
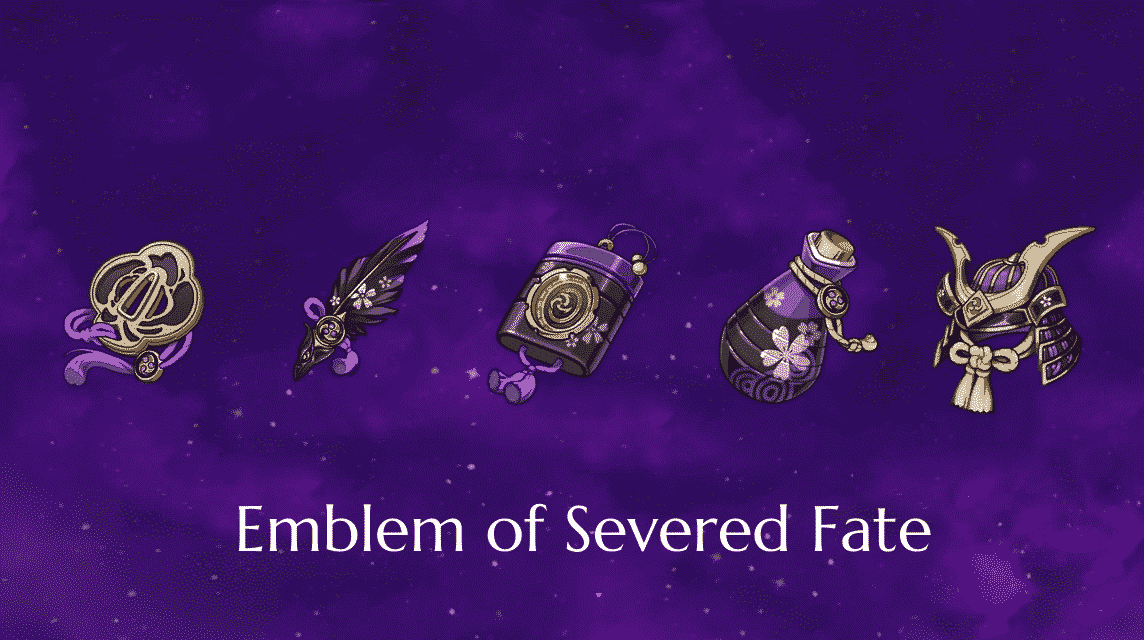
via VCgamers
The set bonuses come into effect at the 2-Piece and 4-Piece levels, delivering a mix of Energy Recharge enhancement and Elemental Burst DMG increase based on Energy Recharge.
This set consists of the following individual artifacts:
- Flower of Life: Magnificent Tsuba – A stunning flower artifact that embodies the beauty of a skillfully crafted sword guard.
- Plume of Death: Sundered Feather – A feather artifact symbolizing the balance between life and the forces that sever fate.
- Sands of Eon: Storm Cage – A timepiece artifact that captures the essence of a storm’s unbridled power.
- Goblet of Eonothem: Scarlet Vessel – A vibrant goblet artifact representing the intensity of passionate emotions.
- Circlet of Logos: Ornate Kabuto – An intricately designed helmet artifact that signifies wisdom and strategy.
When you collect and equip most of these artifacts, your character will benefit from the following set bonuses:
2-Piece Bonus
This bonus grants a 20% increase in Energy Recharge, allowing your character to use their Elemental Burst more frequently.
4-Piece Bonus
Increases Elemental Burst DMG by 25% of Energy Recharge. A maximum of 75% bonus DMG can be obtained in this way.
How to Obtain
You can obtain both the 4-star and 5-star versions of the Emblem of Severed Fate artifacts from the following sources:
Source 1: Momiji-Dyed Court – A location steeped in ancient traditions and vibrant colors, where the Emblem of Severed Fate artifacts can be discovered.
To enhance your character’s energy management and Elemental Burst potential, keep farming this location until you obtain the complete Emblem of Severed Fate set.
Equipping your character with this artifact set will significantly increase their Energy Recharge and Elemental Burst DMG, making them a formidable force in combat.
Tenacity of the Millelith
The Tenacity of the Millelith artifact set is tailored to boost HP and empower both the ATK and Shield Strength of your party members.
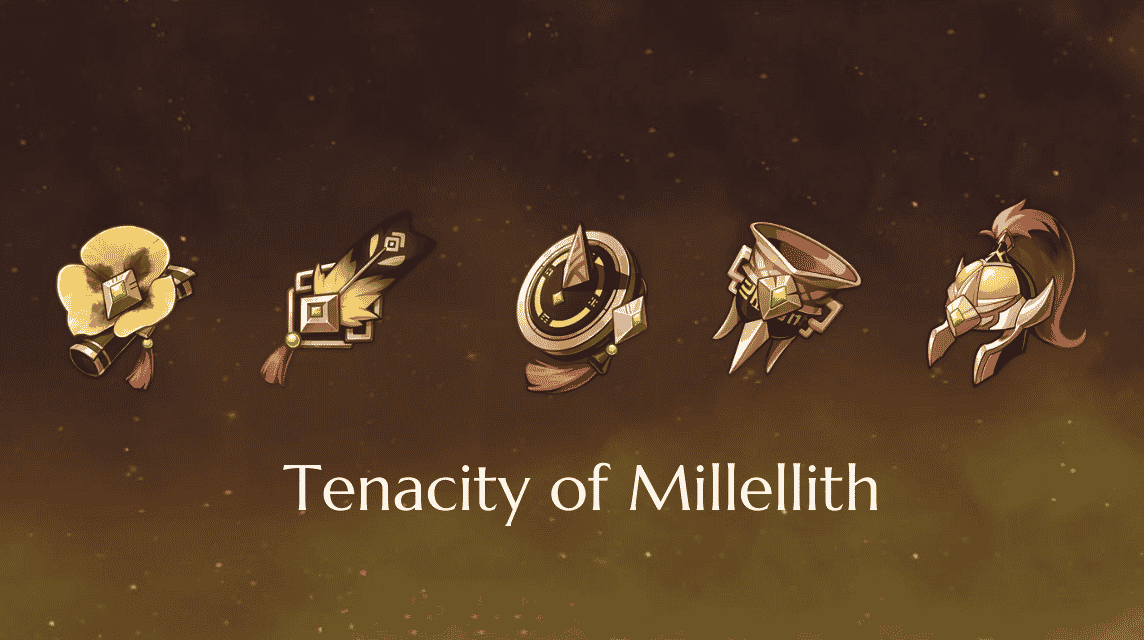
via VCgamers
This set is available in both 4-star and 5-star rarities. The set bonuses activate at the 2-Piece and 4-Piece levels, delivering an HP increase and a unique party-wide ATK and Shield Strength enhancement.
The set comprises the following individual artifacts:
- Flower of Life: Flower of Accolades – A distinguished flower artifact that represents honor and recognition.
- Plume of Death: Ceremonial War-Plume – A battle-worn feather artifact symbolizing the bravery of warriors.
- Sands of Eon: Orichalceous Time-Dial – A timepiece artifact made of a rare, sturdy metal that has withstood the test of time.
- Goblet of Eonothem: Noble’s Pledging Vessel – A goblet artifact that bears witness to the oaths and commitments of nobility.
- Circlet of Logos: General’s Ancient Helm – A historic circlet artifact that once belonged to a renowned general.
When you collect and equip most of these artifacts, your character will benefit from the following set bonuses:
2-Piece Bonus
This bonus grants a 20% increase in HP, enhancing your character’s survivability.
4-Piece Bonus
When an Elemental Skill hits an opponent, the ATK of all nearby party members is increased by 20%, and their Shield Strength is increased by 30% for 3 seconds.
This effect can be triggered once every 0.5 seconds and can still be triggered even when the character using this artifact set is not on the field.
How to Obtain
You can obtain both the 4-star and 5-star versions of the Tenacity of the Millelith artifacts from the following source:
Source 1: Ridge Watch – A strategic vantage point where the artifacts of the Tenacity of the Millelith set can be found.
To optimize your party’s performance, continue farming Ridge Watch until you obtain the complete Tenacity of the Millelith set. Equipping your character with this artifact set will significantly improve their HP, ATK, and Shield Strength, making your entire party more resilient and powerful in battle.
Gilded Dreams
The Gilded Dreams artifact set is specifically tailored to enhance elemental mastery and grant dynamic buffs based on party composition, available in both 4-star and 5-star rarities.
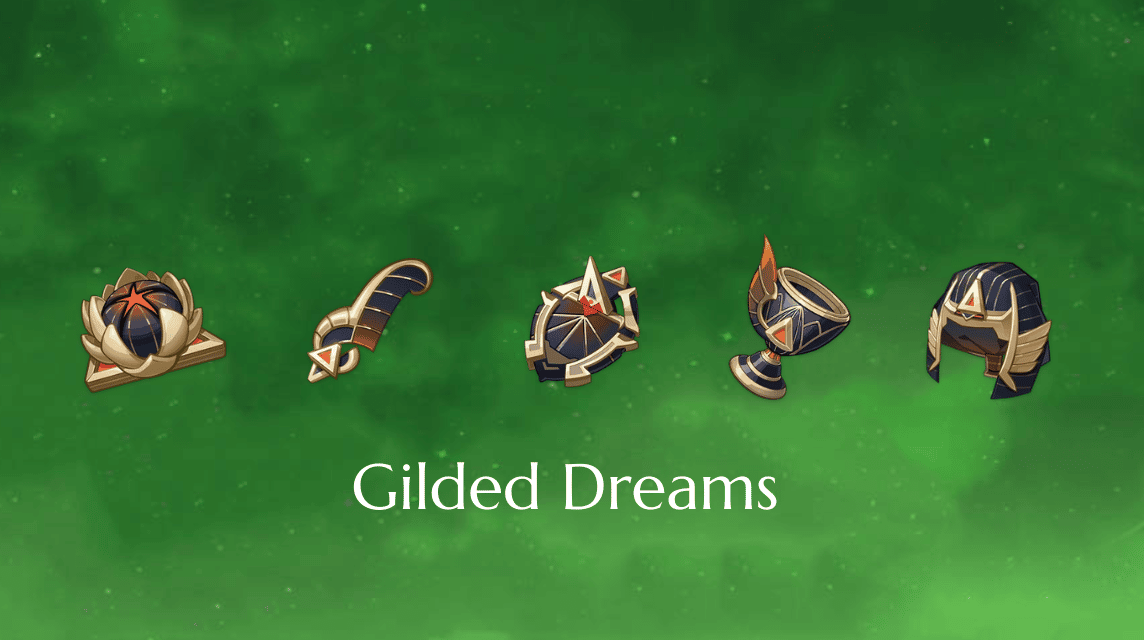
via VCgamers
The set bonuses come into effect at the 2-Piece and 4-Piece levels, providing a combination of Elemental Mastery increase and unique character buffs.
The set features the following individual artifacts:
- Flower of Life: Dreaming Steelbloom – A resplendent flower artifact symbolizing the dreams and aspirations that fuel one’s journey.
- Plume of Death: Feather of Judgment – A feather artifact that represents the weight of decisions and judgments made throughout life.
- Sands of Eon: The Sunken Years – A timepiece artifact that captures the passage of time and the memories that fade within.
- Goblet of Eonothem: Honeyed Final Feast – A goblet artifact that signifies the sweet yet fleeting nature of life’s final moments.
- Circlet of Logos: Shadow of the Sand King – A mysterious circlet artifact that whispers of the long-lost Sand King’s power.
Upon collecting and equipping most of these artifacts, your character will benefit from the following set bonuses:
2-Piece Bonus
This bonus grants Elemental Mastery +80, substantially improving your character’s elemental reactions and damage.
4-Piece Bonus
Within 8 seconds of triggering an Elemental Reaction, the character equipping this set will gain buffs based on the Elemental Type of other party members.
ATK is increased by 14% for each party member with the same Elemental Type as the equipping character, and Elemental Mastery is increased by 50 for every party member with a different Elemental Type. Each of these buffs will count for up to 3 characters.
This effect can be triggered once every 8 seconds. The character who equips this set can still trigger its effects when not on the field.
How to Obtain
Both the 4-star and 5-star versions of the Gilded Dreams artifacts can be acquired from the following sources:
Source 1: Spire of Solitary Enlightenment – A towering, mystical spire that holds the secrets of ancient wisdom. Obtain the Gilded Dreams artifacts by completing challenges within this spire.
To fully unlock your character’s elemental potential, continue farming this location until you have collected the entire Gilded Dreams set. Equipping your character with this artifact set will significantly boost their elemental mastery and provide adaptive buffs based on party composition, making them a versatile force in any elemental encounter.
What’s The Best Team For Thoma?
Thoma is a Pyro-elemental character who possesses formidable abilities that enable him to inflict significant damage upon his adversaries at close range while simultaneously providing support for his team. His Pyro-based attacks are incredibly potent, and he can generate Pyro elemental particles with ease.

via Genshin Impact
To construct a triumphant team around Thoma, players must take into account the elemental reactions that his attacks can elicit. Pyro can trigger elemental reactions like Vaporize and Melt when coupled with Hydro and Cryo elements, respectively. As a result, it is critical to include characters who can generate these elements to increase the overall damage output of the team.
Furthermore, it is essential to consider Thoma’s role within the team. As a damage dealer, he must be partnered with support characters who can provide healing or shields. He can also benefit from characters who can boost his attack or grant him additional buffs. To maximize his effectiveness, players must carefully balance these factors and select characters that can complement Thoma’s abilities.
Pyro Burgeon Team
This team composition focuses on Pyro Burgeon reactions, with Thoma acting as the Pyro trigger.
- Main DPS: Ayato
- Sub-DPS: Thoma
- Sub-DPS: Collei or Nahida
- Support: Traveler (Dendro) or Bennett
In this setup, Thoma complements Ayato’s damage output by enabling strong Pyro Burgeon reactions. Collei or Nahida provide additional elemental reactions, while Traveler (Dendro) or Bennett offer support through healing and elemental buffs.
In the Pyro Burgeon Team, Collei or Nahida can offer additional elemental reactions to Thoma’s Pyro triggers, creating even more opportunities for damage. Meanwhile, Traveler (Dendro) or Bennett can provide valuable support by healing the team and boosting their elemental abilities.
Standard Pyro Sub-DPS Team
Thoma serves as the Pyro Sub-DPS in this team, focusing on off-field Pyro damage to enable Vaporize reactions for the Hydro Main-DPS.
- Main DPS: Tartaglia
- Sub-DPS: Thoma
- Support: Kazuha
- Support: Bennett
With this team, Thoma provides Pyro damage for Tartaglia to trigger Vaporize reactions. Kazuha offers crowd control and elemental mastery buffs, while Bennett supports the team with healing and attack boosts.
Standard Pyro Support Team
In this composition, Thoma functions as a Pyro Support, working alongside a core Pyro Main-DPS and Hydro Sub-DPS.
- Main DPS: Hu Tao
- Sub-DPS: Xingqiu
- Support: Thoma
- Support: Kazuha
Thoma provides shields and a useful buff with his C6 unlocked, while Xingqiu offers additional elemental reactions. Kazuha enhances the team’s elemental mastery and provides crowd control.
Pyro Shielder Support Team
Thoma acts as a Pyro Shielder in this Triple Geo team composition, providing off-field Pyro damage and enabling the Crystallize reaction for increased survivability.
- Main DPS: Itto
- Sub-DPS: Albedo
- Support: Gorou
- Support: Thoma
In this setup, Thoma’s shielding ability and off-field Pyro damage create a sturdy foundation for Itto to deal massive Geo damage. Albedo and Gorou further amplify the Geo-focused team’s damage output and provide additional support.
Thoma: Ability Rundown
Thoma’s kit is very powerful when it comes to shielding, and damage. To maximize Thoma’s potential in combat, it’s crucial to learn his various attacks and their specific uses.
Here’s an in-depth explanation of Thoma’s abilities:
Normal Attack: Spear Combo
Thoma’s normal attack consists of a series of up to four consecutive spear strikes. Each strike inflicts damage on the opponents and can be chained together seamlessly, allowing you to keep the pressure on your enemies.

via Wiki
The rapid succession of strikes makes it an effective way to deal sustained damage to individual targets or small groups.
|
1 |
2 | 3 | 4 | 5 | 6 | 7 | 8 | 9 | 10 |
11 |
|
|
1-Hit DMG (%) |
44.39 | 48.01 | 51.62 | 56.78 | 60.4 | 64.53 | 70.2 | 75.88 | 81.56 | 87.75 | 93.95 |
| 2-Hit DMG (%) | 43.63 | 47.18 | 50.73 | 55.8 | 59.35 | 63.41 | 68.99 | 74.57 | 80.15 | 86.24 |
92.33 |
|
3-Hit DMG (%) |
26.79×2 | 28.97×2 | 31.15×2 | 34.27×2 | 36.45×2 | 38.94×2 | 42.36×2 | 45.79×2 | 49.22×2 | 52.95×2 | 56.69×2 |
| 4-Hit DMG (%) | 67.36 | 72.84 | 78.32 | 86.15 | 91.63 | 97.9 | 106.52 | 115.13 | 123.75 | 133.14 |
142.54 |
Charged Attack: Stamina-Driven Lunge
By consuming a portion of his stamina, Thoma can perform a charged attack that sends him lunging forward. During the lunge, he deals damage to any opponents in his path, making it an ideal move for closing the gap between you and your enemies or swiftly repositioning during combat.

via Wiki
This attack is particularly useful when dealing with multiple enemies or when you need to catch up to a fleeing target.
|
Charged Attack |
|||||||||||
| Charged Attack DMG (%) | 112.75 | 121.92 | 131.1 | 144.21 | 153.39 | 163.88 | 178.3 | 192.72 | 207.14 | 222.87 |
238.6 |
|
Charged Attack Stamina Cost |
25 |
||||||||||
Plunging Attack: Aerial Impact
Thoma’s plunging attack enables him to leap from mid-air and strike the ground with immense force. As he descends, he damages any opponents along his path, culminating in a powerful area-of-effect (AoE) attack upon impact with the ground.

via Wiki
This maneuver is excellent for targeting clusters of enemies or initiating combat from an elevated position, allowing you to take advantage of the terrain and surprise your foes.
|
Plunging Attack |
|||||||||||
|
Plunge DMG (%) |
63.93 | 69.14 | 74.34 | 81.77 | 86.98 | 92.92 | 101.1 | 109.28 | 117.46 | 126.38 | 135.3 |
| Low Plunge DMG (%) | 127.84 | 138.24 | 148.65 | 163.51 | 173.92 | 185.81 | 202.16 | 218.51 | 234.86 | 252.7 |
270.54 |
Elemental Skill: Blazing Blessing
Thoma’s Elemental Skill, Blazing Blessing, is a formidable technique that packs a punch in both offense and defense. With a swift vault forward using his polearm, Thoma delivers a fiery flying kick that unleashes a devastating wave of AoE Pyro damage, leaving enemies reeling in its wake. But that’s not all.
Thoma’s Blazing Blessing also conjures up a powerful Blazing Barrier that protects Thoma and imbues him with the power of Pyro.
The Blazing Barrier is a unique shield that absorbs damage based on a percentage of Thoma’s maximum HP, making it an excellent choice for tanky builds. What’s more, it is 250% more effective at absorbing Pyro damage than other types of damage.

via Wiki
And if you’re lucky enough to obtain a new Blazing Barrier while the old one is still active, you’ll enjoy even more damage absorption as the remaining damage absorption stacks and its duration is refreshed. However, do note that the maximum damage absorption is capped at a certain percentage of Thoma’s maximum HP.
Thoma’s Passive Talent 1, Imbricated Armor, enhances Blazing Blessing by boosting the Shield Strength of the active character by 5% for 6 seconds every time they obtain or refresh a Blazing Barrier. And the effect can be triggered once every 0.3 seconds, stacking up to 5 times. But Thoma’s Constellation Effects take things up a notch.
Constellation Effects
At Constellation Level 1, A Comrade’s Duty, Thoma’s Blazing Barrier comes to the aid of his teammates. Whenever a protected character is attacked, the cooldowns of Blazing Blessing and Crimson Ooyoroi are reduced by 3 seconds. But beware, this effect has a 20-second cooldown.
At Constellation Level 3, Fortified Resolve, Thoma’s Blazing Blessing talent level is increased by 3, elevating its maximum level to 15.
Finally, at Constellation Level 6, Burning Heart, all party members’ Normal, Charged, and Plunging Attack damage is increased by 15% for 6 seconds every time a Blazing Barrier is obtained or refreshed.
| 1 | 2 | 3 | 4 | 5 | 6 | 7 | 8 | 9 | 10 | 11 | 12 | 13 | 14 | |
| Skill DMG (%) | 146.4 | 157.38 | 168.36 | 183 | 193.98 | 204.96 | 219.6 | 234.24 | 248.88 | 263.52 | 278.16 | 292.8 | 311.1 |
329 |
|
Shield DMG Absorption |
7.2% Max HP
+ 693.3 |
7.74% Max HP
+ 762.6 |
8.28% Max HP
+ 837.7 |
9% Max HP
+ 918.7 |
9.54% Max HP
+ 1005 |
10.08% Max HP
+ 1097 |
10.8% Max HP
+ 1196 |
11.52% Max HP
+ 1300 |
12.24% Max HP
+ 1409 |
12.96% Max HP
+ 1525 |
13.68% Max HP
+ 1646 |
14.4% Max HP
+ 1773 |
15.3% Max HP
+ 1906 |
16.2% Max HP
+ 2046 |
| Shield Duration |
8s |
|||||||||||||
|
Max Shield DMG Absorption |
19.6% Max HP
+ 1887 |
21.07% Max HP
+ 2076 |
22.54% Max HP
+ 2280 |
24.5% Max HP
+ 2500 |
25.97% Max HP
+ 2736 |
27.44% Max HP
+ 2988 |
29.4% Max HP
+ 3255 |
31.36% Max HP
+ 3539 |
33.32% Max HP
+ 3838 |
35.28% Max HP
+ 4152 |
37.24% Max HP
+ 4482 |
39.2% Max HP
+ 4829 |
41.65% Max HP
+ 5190 |
44.1% Max HP
+ 5568 |
| Skill CD |
15s |
|||||||||||||
Elemental Burst: Ooyoroi
Thoma’s Elemental Burst, Crimson Ooyoroi, showcases his ability to manipulate Pyro energy by spinning his polearm rapidly. As he slices through his enemies, roaring flames erupt from his weapon, dealing significant area-of-effect (AoE) Pyro damage. These flames then form a powerful protective armor called Scorching Ooyoroi around Thoma or the active character.

via Wiki
Scorching Ooyoroi When active, Scorching Ooyoroi enhances the current character’s Normal Attacks, causing them to trigger a secondary effect called Fiery Collapse. Fiery Collapse releases a cone-shaped AoE Pyro damage every 1 second. Additionally, each Fiery Collapse summons a Blazing Barrier that shields the character from damage.
Blazing Barrier Mechanics The Blazing Barrier created during Scorching Ooyoroi works similarly to the one formed by Thoma’s Elemental Skill, Blazing Blessing.
It absorbs 250% more Pyro damage, and when a new Blazing Barrier is obtained, the remaining damage absorption of the existing barrier stacks, and its duration refreshes. The maximum damage absorption capacity of the Blazing Barrier is capped at a certain percentage of Thoma’s maximum HP. If Thoma is defeated, Scorching Ooyoroi’s effects are removed.

via Wiki
Crimson Ooyoroi Interactions Thoma’s Passive Talent 1, Imbricated Armor, and Passive Talent 2, Flaming Assault, both affect the performance of Crimson Ooyoroi. Imbricated Armor increases the Shield Strength by 5% for 6 seconds whenever a Blazing Barrier is obtained or refreshed, stacking up to 5 times. Flaming Assault boosts Fiery Collapse’s damage by 2.2% of Thoma’s maximum HP.
| 1 | 2 | 3 | 4 | 5 | 6 | 7 | 8 | 9 | 10 | 11 | 12 | 13 | 14 | |
| Skill DMG (%) | 88 | 94.6 | 101.2 | 110 | 116.6 | 123.2 | 132 | 140.8 | 149.6 | 158.4 | 167.2 | 176 | 187 |
198 |
|
Fiery Collapse DMG (%) |
58 | 62.35 | 66.7 | 72.5 | 76.85 | 81.2 | 87 | 92.8 | 98.6 | 104.4 | 110.2 | 116 | 123.25 | 131 |
| Shield DMG Absorption | 1.14% Max HP
+ 110 |
1.23% Max HP
+ 121 |
1.32% Max HP
+ 132.9 |
1.43% Max HP
+ 145.8 |
1.52% Max HP
+ 159.5 |
1.6% Max HP
+ 174.2 |
1.72% Max HP
+ 189.8 |
1.83% Max HP
+ 206.3 |
1.94% Max HP
+ 223.7 |
2.06% Max HP
+ 242 |
2.17% Max HP
+ 261.3 |
2.29% Max HP
+ 281.5 |
2.43% Max HP
+ 302.6 |
2.6% Max HP + 325 |
|
Shield Duration |
8s | |||||||||||||
| Scorching Ooyoroi Duration |
15s |
|||||||||||||
|
Skill CD |
20s | |||||||||||||
| Energy Cost |
80 |
|||||||||||||
Constellation Effects
Thoma’s constellation levels further enhance his Crimson Ooyoroi:
- Constellation Level 1 – A Comrade’s Duty: Decreases the cooldown of Thoma’s Blazing Blessing and Crimson Ooyoroi by 3 seconds whenever a character protected by Thoma’s Blazing Barrier is attacked (excluding Thoma). This effect has a 20-second internal cooldown.
- Constellation Level 2 – A Subordinate’s Skills: Increases Crimson Ooyoroi’s duration by 3 seconds.
- Constellation Level 4 – Long-Term Planning: Restores 15 Energy to Thoma after using Crimson Ooyoroi.
- Constellation Level 5 – Raging Wildfire: Enhances Crimson Ooyoroi’s talent level by 3 and raises its maximum level to 15.
- Constellation Level 6 – Burning Heart: Boosts the damage dealt by all party members’ Normal, Charged, and Plunging Attacks by 15% for 6 seconds when a Blazing Barrier is obtained or refreshed.
Additional Notes
Crimson Ooyoroi does not snapshot Thoma’s stats and will dynamically adjust based on changes in Thoma’s attributes after the ability is cast. Fiery Collapse triggers in the direction of the attack’s impact rather than the character’s facing direction.
It may be triggered by distant Normal Attacks, but Fiery Collapse starts from the player’s position and may not reach the intended target.
Thoma – Passive Talents
Thoma boasts a set of three passive talents that enhance his abilities as a shield support and damage dealer, as well as providing a unique bonus when fishing in Inazuma.
via PC Invasion
Some talents are available as you ascend the character, while others are unlocked automatically. Here’s a detailed breakdown of Thoma’s passive talents and their effects:
Imbricated Armor – Ascension 1 Talent
Upon obtaining or refreshing a Blazing Barrier, the Shield Strength of your active character is increased by 5% for 6 seconds. This effect can be triggered once every 0.3 seconds and can stack up to 5 times. The Imbricated Armor talent further enhances Thoma’s shielding capabilities, offering better protection for your team.
Flaming Assault – Ascension 4 Talent
This talent increases the damage dealt by Thoma’s Crimson Ooyoroi’s Fiery Collapse by 2.2% of his Max HP. By scaling with his maximum health, Flaming Assault allows Thoma to deal more damage as he grows stronger, making him more effective in battles.
Snap and Swing – Utility Passive
Thoma’s Snap and Swing talent provides a unique bonus when fishing successfully in Inazuma. With Thoma’s help, there’s a 20% chance of scoring a double catch. If an Ornamental Fish is caught, the player will receive an additional Ornamental Fish.
It’s important to note that any bonus fish caught won’t count towards the “Ding Ding Ding!” achievement, nor will they be tracked in the archive.
Thoma does not need to be in the active party for Snap and Swing to take effect. In Co-Op Mode, only players who own Thoma can benefit from this passive talent.
Thoma – Constellations
via Reddit
Similar to other characters in Genshin Impact, Thoma possesses a total of six constellations that provide a combination of damage enhancement and utility-based improvements to his abilities.
Here are the detailed effects of Thoma’s Constellations during combat:
Level 1 Constellation – A Comrade’s Duty
This initial constellation benefits Thoma by reducing the cooldowns of his own Blazing Blessing and Crimson Ooyoroi abilities by 3 seconds when a character protected by Thoma’s Blazing Barrier (excluding Thoma himself) is attacked. This effect can be triggered once every 20 seconds, allowing Thoma to provide more frequent support and protection to his allies.
Level 2 Constellation – A Subordinate’s Skills
With this constellation, Thoma’s Crimson Ooyoroi ability has its duration extended by 3 seconds. This extension allows Thoma to maintain his defenses for a longer period, increasing his overall survivability and the protection he offers to his teammates.
Level 3 Constellation – Fortified Resolve
This constellation boosts the power of Thoma’s Blazing Blessing ability by raising its level by 3. The maximum level cap for this ability is increased to 15, enabling Thoma to provide even greater protection and support to his allies with each use of the skill.
Level 4 Constellation – Long-Term Planning
Upon using Crimson Ooyoroi, Thoma receives a restoration of 15 Energy. This energy boost ensures that Thoma can more frequently activate his Elemental Burst, contributing more consistently to his team’s overall performance.
Level 5 Constellation – Raging Wildfire
Thoma’s Crimson Ooyoroi ability becomes even more effective with this constellation, as it increases its level by 3. With a maximum level cap of 15, this enhancement allows Thoma to further improve his defensive capabilities and contribute more significantly to his team’s success in battle.
Level 6 Constellation – Burning Heart
When a Blazing Barrier is obtained or refreshed, this constellation increases the damage dealt by all party members’ Normal, Charged, and Plunging Attacks by 15% for 6 seconds.
This constellation greatly enhances the damage output of Thoma’s allies, making him an even more valuable member of the team.
Activating each of these constellations requires one of Thoma’s Stella Fortuna. As you unlock more constellations, Thoma’s strength and utility in combat will continue to grow, making him an increasingly powerful force in the world of Genshin Impact.
Thoma’s Ascension: Stats And Material Costs
Here are all the ascension bonuses and material costs associated with leveling up Thoma to be your carry:
| Ascension Phase |
Level | Base HP |
Base ATK |
Base DEF |
Special Stat (ATK) |
|---|---|---|---|---|---|
| 0✦ | 1/20 | 866 | 16 | 62 | — |
| 20/20 | 2,225 | 43 | 161 | ||
Ascension Cost (0 → 1)
 Mora 20,000
 Agnidus Agate Sliver 1
 Florescent Fungus 3
 Treasure Hoarder Insignia 3
|
|||||
| 1✦ | 20/40 | 2,872 | 56 | 208 | — |
| 40/40 | 4,302 | 84 | 312 | ||
| Ascension Cost (1 → 2)
Mora 40,000
 Agnidus Agate Fragment 3
Florescent Fungus 10
Treasure Hoarder Insignia 15
 Smoldering Pearl 2
|
|||||
| 2✦ | 40/50 | 4,762 | 93 | 346 | 6.0% |
| 50/50 | 5,477 | 106 | 398 | ||
| Ascension Cost (2 → 3)
Mora 60,000
Agnidus Agate Fragment 6
Florescent Fungus 20
 Silver Raven Insignia 12
Smoldering Pearl 4
|
|||||
| 3✦ | 50/60 | 6,090 | 118 | 442 | 12.0% |
| 60/60 | 6,806 | 132 | 494 | ||
| Ascension Cost (3 → 4)
Mora 80,000
 Agnidus Agate Chunk 3
Florescent Fungus 30
Silver Raven Insignia 18
Smoldering Pearl 8
|
|||||
| 4✦ | 60/70 | 7,266 | 141 | 528 | 12.0% |
| 70/70 | 7,980 | 155 | 579 | ||
| Ascension Cost (4 → 5)
Mora 100,000
Agnidus Agate Chunk 6
Florescent Fungus 45
 Golden Raven Insignia 12
Smoldering Pearl 12
|
|||||
| 5✦ | 70/80 | 8,440 | 164 | 613 | 18.0% |
| 80/80 | 9,155 | 178 | 665 | ||
| Ascension Cost (5 → 6)
Mora 120,000
 Agnidus Agate Gemstone 6
Florescent Fungus 60
Golden Raven Insignia 24
Smoldering Pearl 20
|
|||||
| 6✦ | 80/90 | 9,615 | 187 | 698 | 24.0% |
| 90/90 | 10,331 | 201 | 750 | ||
Thoma: Talent Upgrade Materials
Talents are yet another core component of Thoma’s overall kit. Here’s everything you need to evolve his Talents:
| Talent Level |
Required Ascension |
Mora [Subtotal] |
Enhancement Materials [Subtotal] |
Character Talent Materials [Subtotal] |
||
|---|---|---|---|---|---|---|
| 1 → 2 | 2✦ |
Mora 12,500
|
Treasure Hoarder Insignia 6
|
Teachings of Transience 3
|
||
| 2 → 3 | 3✦ |
Mora 17,500
|
Silver Raven Insignia 3
|
Guide To Transience 2
|
||
| 3 → 4 |
Mora 25,000
|
Silver Raven Insignia 4
|
Guide To Transience 4
|
|||
| 4 → 5 | 4✦ |
Mora 30,000
|
Silver Raven Insignia 6
|
Guide To Transience 6
|
||
| 5 → 6 |
Mora 37,500
|
Silver Raven Insignia 9
|
Guide To Transience 9
|
|||
| 6 → 7 | 5✦ |
Mora 120,000
|
Golden Raven Insignia 4
|
Philosophies of Transience 4
|
 Hellfire Butterfly 1
|
|
| 7 → 8 |
Mora 260,000
|
Golden Raven Insignia 6
|
Philosophies of Transience 6
|
Hellfire Butterfly 1
|
||
| 8 → 9 | 6✦ |
Mora 450,000
|
Golden Raven Insignia 9
|
Philosophies of Transience 12
|
Hellfire Butterfly 2
|
|
| 9 → 10 |
Mora 700,000
|
Golden Raven Insignia 12
|
Philosophies of Transience 16
|
Hellfire Butterfly 2
|
 Crown of Insight 1
|
|
Thoma: Blazing Defense: Lore & Ability Showcase
Here is the official showcase of Thoma’s kit, and character:
Conclusion
In conclusion, Thoma is a versatile and valuable character in Genshin Impact, offering exceptional defensive capabilities, support, and damage enhancements to his teammates.
As you progress through the game and unlock Thoma’s constellations, his potential as a steadfast protector and enabler for your team will continue to flourish.
By understanding and maximizing Thoma’s abilities and constellations, players can effectively utilize him to navigate the challenges of Teyvat, ensuring that their team remains well-protected and capable of dealing significant damage to their foes.
Ultimately, Thoma is an excellent addition to any Genshin Impact team composition, solidifying his place as a reliable and formidable force in the game.


